Thursday, December 31, 2009

Once in a blue moon

Every now and then, I come up with a slightly off-the-wall idea for a design. On this New Year's Eve, with a blue moon high in the sky, I'm counting down the minutes until midnight with a new clock design!

My inspiration for this design is an actual tall case clock crafted around 1796 by Simon Willard (1753-1848), the premier clockmaker of colonial America. Born in Grafton, Massachusetts, one of four clock-making brothers, Willard was singularly influential in advancing the design of clock movements at a point when wealthy colonists began to clamor for timepieces for their homes.

By the time this clock was made, Willard had moved to Roxbury, Massachusetts, where he set up shop with his brother Aaron. The advertisement for the clock described it as one of a line of "common eight-day clocks with very elegant faces and mahogany cases, priced from 50 to 60 dollars." Little did Simon Willard dream that just over two hundred years later, one of his tall case clocks would sell at auction for more than two million dollars!

The case itself, crafted by an unknown cabinetmaker, is of Hepplewhite design. It boasts of quarter-fan inlays, rope banding, and brass finials above the fretwork on the top. I've situated the clock in a hallway setting typical of the period, complete with dentil crown molding, chair rail and floor molding. Wallpaper above the chair rail and wainscoting below it are also in keeping with interior decoration of the day.

Join me as I explore new territory for 2010!

Monday, December 28, 2009

Ending the year in Australia


Macquarie Lightstation is finished well before New Year's Eve!

I finished the tower itself, working the dome in the foreground in a satin stitch with white DMC cotton floss. Underneath the dome, the two rows of molding were formed with gobelin stitches over two threads. The ornament on top of the dome was stitched with an oblong cross stitch vertically, followed by another oblong cross stitched horizontally on top of the first.

I then added shading with DMC ecru floss and windows worked in a spring stitch with DMC floss #318. The weather vane, railing and fence in front of the lighthouse all used black DMC rayon floss to add a bit of shine without the glint of a metallic thread.

The roof of the cottage to the left of the lighthouse was worked in a slanted gobelin stitch over four threads with DMC floss #838. The foundation of the lighthouse was stitched with DMC floss #414, and grass was added with Sheep's Silk "Green Leaves Dark."

All that remained was the tree, which I had thought to be a deciduous variety. Luckily, before I French-knotted myself into deep trouble, both DH and Judy Harper set me straight that it was a pine tree--specifically, a Norfolk pine from Norfolk Island off the east coast of Australia. So I stitched it with Impressions "Pine Forest," in slanted long stitches following the direction the branches were growing and turning my canvas 90 degrees where necessary. The trunk was formed in tent stitches with Felicity's Garden "Fawn."

Macquarie Lightstation makes the twelfth lighthouse I've adapted to needlepoint and stitched in 2009--not too shabby for a year's work! Only twelve more to go, and I'll hit 100!

Saturday, December 26, 2009

Halfway there


Poor Macquarie Lightstation! For days I've been picking it up, stitching a little bit, then putting it down to attend to holiday chores. When I finally had a minute to take a photo today, I realized it was a little more than half finished!

The tower itself was stitched with white DMC cotton floss, mostly in basketweave with a few decorative stitches for architectural elements--satin stitch for the dome of the lantern room, gobelin stitches over two threads for the foundation of the railing and the molding underneath it.

The sky is in the process of needle-blending and it, too, is almost finished! I began at the top with four plies of DMC floss #597, then added DMC #598 and 3811 in a 3/1, 2/2, 1/3 combination of plies. I'm currently at two plies of DMC #598 and two plies of DMC #3811--I'll finish off the left side with one ply of DMC #598 and three plies of #3811, and end the right side with four plies of #3811.

When I've finished stitching the lighthouse itself, I can complete the sky and then add the shading as well as the weather vane and railing.

Thursday, December 24, 2009

A Cape Cod Christmas


The presents are --finally--wrapped and tucked under the Christmas tree for the morning. I wanted to share a little of my Cape Cod Christmas with you before I rejoin my family to discover what's lurking in the stockings. And no, the stockings aren't needlepointed--cobblers' children don't have shoes, either--but two of them were knitted by yours truly the first year we were married, and are still hanging in there--the stockings and us!

This is a photo of our family room mantel decorated for the holidays Cape-style. I might have been born in Connecticut, but my parents took me to the Cape on vacation for the first time when I was eight months old. I guess the sea air got to me even at that early age! I'm not sure if you can see them if you click on the photo for an enlargement, but there are three lighthouses in the Elizabeth Mumford painting.

To all who celebrate this wondrous holiday, Merry Christmas! And to all my stiching friends who observe other holidays, May the Floss be with you!

Tuesday, December 22, 2009

In search of summer Down Under


It's hard to think warm thoughts when 2-1/2 foot snow drifts are piled up against the front of your house. So on this first full day of winter, I'm headed Down Under as an armchair traveler to celebrate the first full day of summer! My last lighthouse design for 2009 will be Macquarie Lightstation, the first lighthouse constructed in Australia, located in Vaucluse, a suburb of Sydney in New South Wales.

Less than a year after the First Fleet arrived in 1791 to settle New South Wales, a flagstaff was erected on this site. The first aid to navigation, a wood and coal-burning apparatus in a basket mounted on a tripod, was lit in 1793.

The first lighthouse structure was commissioned in 1816 by Lachlan Macquarie, governor of Australia from 1810 to 1822, and completed in 1818. Its designer was the famous convict architect Francis Greenway, whose work so impressed Macquarie that the governor granted Greenway a pardon. The designer's warning about the fragility of the sandstone with which the lighthouse was constructed soon became evident: as early as 1823, large stones fell away, and iron bands were placed around the tower to prevent further shifting of the building materials.

In 1883, a new lighthouse--virtually identical in appearance but constructed of sturdier materials--rose next to the original structure, and the two towers stood side-by-side for several years before the original tower was demolished. The original lens was automated in 1976, and the lightkeeper dismissed in 1989. But the Macquarie Lightstation's characteristic flashing light still shines with a range of 25 nautical miles across Sydney Harbour into the Pacific Ocean.

Sunday, December 20, 2009

Farewell to Port Dalhousie


Another lighthouse is finished--Port Dalhousie in St. Catherines, Ontario. This makes lighthouse #87, but who's counting?

I stitched the water last night in a horizontal diagonal cashmere stitch to provide a hint of movement. To keep the water behind the lighthouse in the background, I used DMC cotton floss #312, while the water in the foreground was worked in one shade darker--#311. The difference in color adds a bit of depth to the overall canvas.

What's next? I'll have plenty of time to contemplate that today--there's upwards of a foot of snow on the ground and the flakes are still falling. I'd take a photo, but the windows are snowed over so you can't really see outside--think of the Ice Palace in Dr. Zhivago. If only Omar Sharif would stumble in now, we could have a rousing game of bridge!

Saturday, December 19, 2009

Only the water remains!


Finally--I finished needle-blending the sky for Port Dalhousie! I used three successive shades of DMC cotton floss--#3841, 3325, and 3755--and, since I was working from the horizon with the canvas turned upside-down, ended at the top with four full plies of #3755.

I then completed the lantern room with DMC floss #3848, with #3847 for the shadowing. The beacon itself was worked in tent stitches using Kreinik #12 tapestry braid #002.

All that remains now is to select floss from the same blue family of DMC floss and stitch the water!

Friday, December 18, 2009

One week 'til Mele Kalikimaka


The best of intentions tend to get knocked into a cocked hat at this time of year! Under normal circumstances, I would have finished needle-blending the sky on the Port Dalhousie lighthouse days ago--but I'm still slogging away. With only one week until Christmas Day, I thought this might be a good time to wish a Happy Holidays to my friends and readers in Hawaii.

This little mini-sock design, Mele Kalikimaka--Merry Christmas in Hawaiian--is based on the gorgeous quilt designs that Hawaiians have created over the years. The floral framework was satin-stitched in Trio "Really Red" for the flowers and Petite Very Velvet in tent stitch for the leaves. The "quilted" sections are framed Scotch stitches worked in white DMC cotton floss.

It's a pretty simple combination of threads and stitches, really, but I think it's effective when worked in the traditional colors of the season!

Wednesday, December 16, 2009

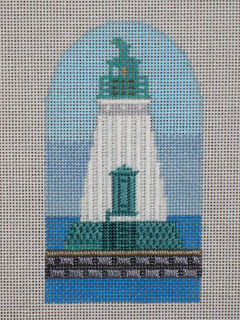
The wearing of the (teal) green


The first thing to be stitched on the Port Dalhousie lighthouse canvas was the tower itself. The siding is best described as vertical clapboards, so I worked this with DMC white cotton floss in alternating rows of tent stitches and vertical gobelin stitches over two threads.

Then I couldn't resist: I had to add a little of the teal green! The best color match was DMC floss #3848, which I stitched in a series of gobelin stitches to form the door. The base of the lighthouse was worked in a Nobuko stitch, with shading provided by DMC floss #3847 in tent stitch around the ladder and handrail.

On to the sky, which I'm needle-blending from the horizon up with the canvas turned upside-down. I started with four plies of DMC #3841, adding one ply of DMC #3325 in a 3/1, 2/2 combination so far.

I hosted the December meeting of our local needlework group yesterday--an atmosphere not conducive to needle-blending, with little plies of floss lying around--so I switched to DMC #5 perle cotton to work the foundation of the marina upon which the lighthouse sits. The concrete deck was formed by a gobelin stitch over two threads with #644. The blocks of stone underneath it were worked in a Scotch stitch variation in #414 perle cotton framed by #413 perle cotton.

Now that my social obligation is over, I can go back to needle-blending the rest of the sky and return to my favorite teal green floss to finish the base and work the lantern room!

Saturday, December 12, 2009

A lighthouse of a different color


How do I select a lighthouse to adapt to needlepoint? Sometimes it's the historical significance of the structure that intrigues me. Often I'm asked to work up a design because that lighthouse has personal significance to a customer. But when a friend sent me a photo of this one--Port Dalhousie Front Range lighthouse in St. Catherines, Ontario--the color scheme really grabbed me. I'd never seen a teal green and white lighthouse before!

The Front Range lighthouse and its sister Rear Range lighthouse, now decommissioned, are located at a marina in Port Dalhousie, which marked the northern tip of the Welland Canal from 1829 to 1932. The Welland Canal aided navigation by connecting Lake Ontario and Lake Erie and allowing ships to bypass Niagara Falls. The Front Range lighthouse was commissioned in 1879 and, by the turn of the century, had become a popular destination for tourists from Toronto.

When the Welland Canal's northern terminus was moved to Port Weller in 1932, tourism at Port Dalhousie waned. Both lights were automated in 1968; the Rear Range light was deactivated in 1988 and put in use in 1999 by the Niagara College Sailing School. Under the supervision of the Canadian Coast Guard, the characteristic white light of the Front Range lighthouse--my next project-- still flashes today.

Thursday, December 10, 2009

It's beginning to look a lot like Christmas!


Our Lighthouse Tree for 2009 is finally decorated!

Adorning the tree are 80 needlepoint lighthouse ornaments--and maybe 83 by Christmas, since I'm awaiting the last of the finishing to arrive. The ornaments represent 26 states and three Canadian provinces: from Vancouver, British Columbia, to Peggy's Cove, Nova Scotia, and from Los Angeles, California, to Jupiter Inlet, Florida.

Atop the tree is a starfish--after all, we do live on Cape Cod!

Three more canvases didn't make the cut-off for Christmas finishing, but that means I have a leg up on next year's tree. And maybe I can squeak another lighthouse in before next year!

Tuesday, December 8, 2009

Stitching with raffia


The little "Gifts" ornament is completed--all that remained was to replace the hay under the vessels. And there's no better way to convey the look of straw than to use the real thing!

I've stitched with raffia before--it's perfect for stuffing peeking out of the sleeves and pant legs of scarecrows, cornstalks, witches' brooms, barnyards, and stables. It's the original "eco-friendly" thread, and much less expensive than bamboo or soy fibers. It's readily available at crafts stores across the country, and I'm sure your LNS would forgive this one transgression! But it's not always the easiest "thread" to use, so I thought I'd pass along a few tips to make the experience more enjoyable.

First: Switch to a larger needle than you'd normally use. The "Gifts" design was painted on 18 ct. canvas, for which I use a size 22 needle. I changed over to a size 20 to stitch the raffia--it's gentler on the strand of raffia passing through the eye of the needle and also enlarges the canvas holes so it's easier to pull the strand through.

Second: Be picky in choosing the strands you'll use. There's an awful lot of raffia in a two-ounce package, so you can afford to be picky! You'll want to select strands that are softer and approximately the thickness of other threads you'd use on the canvas. Avoid brittle strands, which can easily crack. If you notice any fine "hairs" along the strand, strip them away before stitching--they'll probably poke through as you stitch. And be sure to use short lengths to minimize wear-and-tear on the straw.

Third: Stay loose! Pull the strands gently through the canvas, both on the front and back. If a strand looks like it's starting to fray, end it off on the back of the canvas and start another strand.

Fourth: Stitch the raffia on top of areas previously stitched. If the straw should crack several years down the road, you'll still see stitched areas rather than bare canvas and the ornament won't be ruined.

If all of these admonitions sound like too much effort to use raffia, consider this: how many of us struggle with slippery rayon threads and persevere, because the final effect the thread produces outweighs the difficulties? I'm really happy with the way this canvas turned out--the juxtaposition of sparkly gifts against the simplicity of straw was exactly the look I was going for!

Monday, December 7, 2009

All but the hay


All three gifts are finally stitched, and the star has re-appeared in the sky!

Frankincense was a multi-step process, using Kreinik #12 tapestry braid in #001 and #025.
The top of the vessel was worked in a satin stitch and the neck was stitched in braided knitting. For the body, I stitched a framework with the gray metallic and inserted silver cross stitches. I then added another row of braided knitting and finally a row of slanted gobelin stitches over two threads.

Myrrh was also stitched in two shades of Kreinik #12 tapestry braid: #221 (copper) and #2122 (curry). The rim and base were worked in gobelin stitch over two threads, while the neck was worked in satin stitch. The body was stitched in basketweave with the curry metallic. The motif was centered by a Leviathan stitch variation over three threads, with half Scotch stitches at its four corners--all in the copper metallic.

The star was worked over the Petite Very Velvet sky with Kreinik #12 tapestry braid #202HL.

All that remains now is for me to stitch the hay back in, and I'm done!

Saturday, December 5, 2009

One down, two to go


Boy, it's tough sneaking in some stitching at this busy time of year!

The star has now totally disappeared in the sky as I plod along with the navy Petite Very Velvet. The chest of gold is also finished. Tent stitches in Kreinik #12 tapestry braid #002V outline the sides, with slanted gobelin stitches over two threads forming the straps in the center. The lock is a combination of two oblong cross stitches--the first worked vertically, and the second worked over it horizontally.

At this point, you may well be thinking that this is shaping up to be a rather dark Christmas ornament. But consider that some of the sky and most of the brown earth at the bottom of the canvas will be covered later by the hay, and I promise the star will re-appear!

I paid a visit to my LNS and obtained the silver and copper threads I need for the other two gifts. In between placing ornaments on our Christmas tree, I'm auditioning various stitches on some doodle canvas so I can bring these elements to life!

Friday, December 4, 2009

First you see it, then you don't


"Hey, where did the hay go?" you may well ask. I stitched over it, using DMC cotton floss #898 in basketweave, for several reasons.

First, I wanted the straw to be padded to give it added dimension. Also, I'll be working the straw in long stitches, and it's much easier to stitch over the basketweave than it is to insert tent stitches around the long ones later. There's one more good reason for the underlayment, but I'll get into that when I actually stitch the straw as the final step.

You'll notice the star is also disappearing behind the navy Petite Very Velvet I'm using, again in basketweave, to stitch the sky. I'll go back later and stitch the star directly over the PVV.

I want each of the "gifts" to look aged, so I rummaged in my stash for a thread that closely resembled weathered wood for the chest of gold. I chose Felicity's Garden "Fawn," a silk/wool blend about the weight of crewel wool, working it in slanted gobelin stitches over three threads. I have the gold thread for the trim on the chest, but deliberately didn't stitch it yet so you could better see the nice loft created by the Felicity's Garden. This gives the chest some added dimension, too, so it won't get lost in the hay later on.

Now I'm off to my LNS to purchase some "aged" silver and copper for the other gifts!

Wednesday, December 2, 2009

Simple gifts


It's only December 2, but already I'm getting bummed by advertisements on TV and in print, hyping the "latest and greatest" in holiday gifts. What child could possibly want a motorized hamster, for instance, when the little tyke could have the real thing? And in this economy, ads showing luxury sedans with big red bows on their roofs seem sadly out of taste.

So I was inspired to "go back to the basics" in my newest design, called simply "Gifts." It incorporates the traditional gifts of the Magi--frankincense, gold and myrrh--nestled in the straw of a stable against the background of a night sky, holding the promise of a single star.

I'll be stitching this with well-known threads--and a not-so-common one, so do come back and check my progress in a couple of days!

Tuesday, December 1, 2009

Under the radar screen


Over the past couple of weeks, I've been stitching on another canvas between projects. And yes, Virginia, it's another ornament for the 2010 Christmas dining room!

When Judy Harper showed some of her shell designs on her blog (www.fairy-crafts.blogspot.com) a month or so ago, I decided one of these would be ideal for the DR collection. A stitched shell on Cape Cod might sound a little like bringing coals to Newcastle, but adding a different shape to what I've stitched so far appealed to me.

When the canvas arrived and I took a better look at it, I came to the conclusion that the only way I could do justice to the design was to basketweave the whole thing. The trick, however, would be to keep it from looking flat and lifeless--and here's where having different pastel threads already in my stash came in handy!

The five main "ribs" of the shell were stitched with DMC cotton floss #819, with DMC floss #818 on either side and at the bottom. The darker "ribs" were stitched with Fleur de Paris fine mesh velour to add some texture, while the "bling" factor was added with Kreinik #12 tapestry braid #092.

Dressing up the shell are "pearls" outlined in Kreinik #12 tapestry braid #002V. The large "pearls" were worked in a Leviathan stitch variation and the smaller ones in Smyrna crosses, both using Kreinik #12 tapestry braid #032.

This canvas makes a good case for the "Know when to hold 'em, know when to fold "em" aspect of needlepoint: there are times when basketweave is the only game in town. I'm as big a fan of decorative stitches as the next person, but in this instance, "fancy stuff" would have ruined the lines of the design.