Thursday, December 31, 2009

Once in a blue moon

Every now and then, I come up with a slightly off-the-wall idea for a design. On this New Year's Eve, with a blue moon high in the sky, I'm counting down the minutes until midnight with a new clock design!

My inspiration for this design is an actual tall case clock crafted around 1796 by Simon Willard (1753-1848), the premier clockmaker of colonial America. Born in Grafton, Massachusetts, one of four clock-making brothers, Willard was singularly influential in advancing the design of clock movements at a point when wealthy colonists began to clamor for timepieces for their homes.

By the time this clock was made, Willard had moved to Roxbury, Massachusetts, where he set up shop with his brother Aaron. The advertisement for the clock described it as one of a line of "common eight-day clocks with very elegant faces and mahogany cases, priced from 50 to 60 dollars." Little did Simon Willard dream that just over two hundred years later, one of his tall case clocks would sell at auction for more than two million dollars!

The case itself, crafted by an unknown cabinetmaker, is of Hepplewhite design. It boasts of quarter-fan inlays, rope banding, and brass finials above the fretwork on the top. I've situated the clock in a hallway setting typical of the period, complete with dentil crown molding, chair rail and floor molding. Wallpaper above the chair rail and wainscoting below it are also in keeping with interior decoration of the day.

Join me as I explore new territory for 2010!

Monday, December 28, 2009

Ending the year in Australia


Macquarie Lightstation is finished well before New Year's Eve!

I finished the tower itself, working the dome in the foreground in a satin stitch with white DMC cotton floss. Underneath the dome, the two rows of molding were formed with gobelin stitches over two threads. The ornament on top of the dome was stitched with an oblong cross stitch vertically, followed by another oblong cross stitched horizontally on top of the first.

I then added shading with DMC ecru floss and windows worked in a spring stitch with DMC floss #318. The weather vane, railing and fence in front of the lighthouse all used black DMC rayon floss to add a bit of shine without the glint of a metallic thread.

The roof of the cottage to the left of the lighthouse was worked in a slanted gobelin stitch over four threads with DMC floss #838. The foundation of the lighthouse was stitched with DMC floss #414, and grass was added with Sheep's Silk "Green Leaves Dark."

All that remained was the tree, which I had thought to be a deciduous variety. Luckily, before I French-knotted myself into deep trouble, both DH and Judy Harper set me straight that it was a pine tree--specifically, a Norfolk pine from Norfolk Island off the east coast of Australia. So I stitched it with Impressions "Pine Forest," in slanted long stitches following the direction the branches were growing and turning my canvas 90 degrees where necessary. The trunk was formed in tent stitches with Felicity's Garden "Fawn."

Macquarie Lightstation makes the twelfth lighthouse I've adapted to needlepoint and stitched in 2009--not too shabby for a year's work! Only twelve more to go, and I'll hit 100!

Saturday, December 26, 2009

Halfway there


Poor Macquarie Lightstation! For days I've been picking it up, stitching a little bit, then putting it down to attend to holiday chores. When I finally had a minute to take a photo today, I realized it was a little more than half finished!

The tower itself was stitched with white DMC cotton floss, mostly in basketweave with a few decorative stitches for architectural elements--satin stitch for the dome of the lantern room, gobelin stitches over two threads for the foundation of the railing and the molding underneath it.

The sky is in the process of needle-blending and it, too, is almost finished! I began at the top with four plies of DMC floss #597, then added DMC #598 and 3811 in a 3/1, 2/2, 1/3 combination of plies. I'm currently at two plies of DMC #598 and two plies of DMC #3811--I'll finish off the left side with one ply of DMC #598 and three plies of #3811, and end the right side with four plies of #3811.

When I've finished stitching the lighthouse itself, I can complete the sky and then add the shading as well as the weather vane and railing.

Thursday, December 24, 2009

A Cape Cod Christmas


The presents are --finally--wrapped and tucked under the Christmas tree for the morning. I wanted to share a little of my Cape Cod Christmas with you before I rejoin my family to discover what's lurking in the stockings. And no, the stockings aren't needlepointed--cobblers' children don't have shoes, either--but two of them were knitted by yours truly the first year we were married, and are still hanging in there--the stockings and us!

This is a photo of our family room mantel decorated for the holidays Cape-style. I might have been born in Connecticut, but my parents took me to the Cape on vacation for the first time when I was eight months old. I guess the sea air got to me even at that early age! I'm not sure if you can see them if you click on the photo for an enlargement, but there are three lighthouses in the Elizabeth Mumford painting.

To all who celebrate this wondrous holiday, Merry Christmas! And to all my stiching friends who observe other holidays, May the Floss be with you!

Tuesday, December 22, 2009

In search of summer Down Under


It's hard to think warm thoughts when 2-1/2 foot snow drifts are piled up against the front of your house. So on this first full day of winter, I'm headed Down Under as an armchair traveler to celebrate the first full day of summer! My last lighthouse design for 2009 will be Macquarie Lightstation, the first lighthouse constructed in Australia, located in Vaucluse, a suburb of Sydney in New South Wales.

Less than a year after the First Fleet arrived in 1791 to settle New South Wales, a flagstaff was erected on this site. The first aid to navigation, a wood and coal-burning apparatus in a basket mounted on a tripod, was lit in 1793.

The first lighthouse structure was commissioned in 1816 by Lachlan Macquarie, governor of Australia from 1810 to 1822, and completed in 1818. Its designer was the famous convict architect Francis Greenway, whose work so impressed Macquarie that the governor granted Greenway a pardon. The designer's warning about the fragility of the sandstone with which the lighthouse was constructed soon became evident: as early as 1823, large stones fell away, and iron bands were placed around the tower to prevent further shifting of the building materials.

In 1883, a new lighthouse--virtually identical in appearance but constructed of sturdier materials--rose next to the original structure, and the two towers stood side-by-side for several years before the original tower was demolished. The original lens was automated in 1976, and the lightkeeper dismissed in 1989. But the Macquarie Lightstation's characteristic flashing light still shines with a range of 25 nautical miles across Sydney Harbour into the Pacific Ocean.

Sunday, December 20, 2009

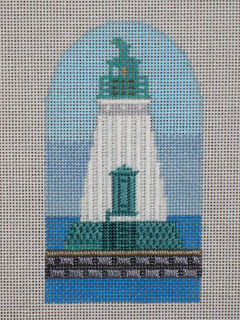
Farewell to Port Dalhousie


Another lighthouse is finished--Port Dalhousie in St. Catherines, Ontario. This makes lighthouse #87, but who's counting?

I stitched the water last night in a horizontal diagonal cashmere stitch to provide a hint of movement. To keep the water behind the lighthouse in the background, I used DMC cotton floss #312, while the water in the foreground was worked in one shade darker--#311. The difference in color adds a bit of depth to the overall canvas.

What's next? I'll have plenty of time to contemplate that today--there's upwards of a foot of snow on the ground and the flakes are still falling. I'd take a photo, but the windows are snowed over so you can't really see outside--think of the Ice Palace in Dr. Zhivago. If only Omar Sharif would stumble in now, we could have a rousing game of bridge!

Saturday, December 19, 2009

Only the water remains!


Finally--I finished needle-blending the sky for Port Dalhousie! I used three successive shades of DMC cotton floss--#3841, 3325, and 3755--and, since I was working from the horizon with the canvas turned upside-down, ended at the top with four full plies of #3755.

I then completed the lantern room with DMC floss #3848, with #3847 for the shadowing. The beacon itself was worked in tent stitches using Kreinik #12 tapestry braid #002.

All that remains now is to select floss from the same blue family of DMC floss and stitch the water!

Friday, December 18, 2009

One week 'til Mele Kalikimaka


The best of intentions tend to get knocked into a cocked hat at this time of year! Under normal circumstances, I would have finished needle-blending the sky on the Port Dalhousie lighthouse days ago--but I'm still slogging away. With only one week until Christmas Day, I thought this might be a good time to wish a Happy Holidays to my friends and readers in Hawaii.

This little mini-sock design, Mele Kalikimaka--Merry Christmas in Hawaiian--is based on the gorgeous quilt designs that Hawaiians have created over the years. The floral framework was satin-stitched in Trio "Really Red" for the flowers and Petite Very Velvet in tent stitch for the leaves. The "quilted" sections are framed Scotch stitches worked in white DMC cotton floss.

It's a pretty simple combination of threads and stitches, really, but I think it's effective when worked in the traditional colors of the season!

Wednesday, December 16, 2009

The wearing of the (teal) green


The first thing to be stitched on the Port Dalhousie lighthouse canvas was the tower itself. The siding is best described as vertical clapboards, so I worked this with DMC white cotton floss in alternating rows of tent stitches and vertical gobelin stitches over two threads.

Then I couldn't resist: I had to add a little of the teal green! The best color match was DMC floss #3848, which I stitched in a series of gobelin stitches to form the door. The base of the lighthouse was worked in a Nobuko stitch, with shading provided by DMC floss #3847 in tent stitch around the ladder and handrail.

On to the sky, which I'm needle-blending from the horizon up with the canvas turned upside-down. I started with four plies of DMC #3841, adding one ply of DMC #3325 in a 3/1, 2/2 combination so far.

I hosted the December meeting of our local needlework group yesterday--an atmosphere not conducive to needle-blending, with little plies of floss lying around--so I switched to DMC #5 perle cotton to work the foundation of the marina upon which the lighthouse sits. The concrete deck was formed by a gobelin stitch over two threads with #644. The blocks of stone underneath it were worked in a Scotch stitch variation in #414 perle cotton framed by #413 perle cotton.

Now that my social obligation is over, I can go back to needle-blending the rest of the sky and return to my favorite teal green floss to finish the base and work the lantern room!

Saturday, December 12, 2009

A lighthouse of a different color


How do I select a lighthouse to adapt to needlepoint? Sometimes it's the historical significance of the structure that intrigues me. Often I'm asked to work up a design because that lighthouse has personal significance to a customer. But when a friend sent me a photo of this one--Port Dalhousie Front Range lighthouse in St. Catherines, Ontario--the color scheme really grabbed me. I'd never seen a teal green and white lighthouse before!

The Front Range lighthouse and its sister Rear Range lighthouse, now decommissioned, are located at a marina in Port Dalhousie, which marked the northern tip of the Welland Canal from 1829 to 1932. The Welland Canal aided navigation by connecting Lake Ontario and Lake Erie and allowing ships to bypass Niagara Falls. The Front Range lighthouse was commissioned in 1879 and, by the turn of the century, had become a popular destination for tourists from Toronto.

When the Welland Canal's northern terminus was moved to Port Weller in 1932, tourism at Port Dalhousie waned. Both lights were automated in 1968; the Rear Range light was deactivated in 1988 and put in use in 1999 by the Niagara College Sailing School. Under the supervision of the Canadian Coast Guard, the characteristic white light of the Front Range lighthouse--my next project-- still flashes today.

Thursday, December 10, 2009

It's beginning to look a lot like Christmas!


Our Lighthouse Tree for 2009 is finally decorated!

Adorning the tree are 80 needlepoint lighthouse ornaments--and maybe 83 by Christmas, since I'm awaiting the last of the finishing to arrive. The ornaments represent 26 states and three Canadian provinces: from Vancouver, British Columbia, to Peggy's Cove, Nova Scotia, and from Los Angeles, California, to Jupiter Inlet, Florida.

Atop the tree is a starfish--after all, we do live on Cape Cod!

Three more canvases didn't make the cut-off for Christmas finishing, but that means I have a leg up on next year's tree. And maybe I can squeak another lighthouse in before next year!

Tuesday, December 8, 2009

Stitching with raffia


The little "Gifts" ornament is completed--all that remained was to replace the hay under the vessels. And there's no better way to convey the look of straw than to use the real thing!

I've stitched with raffia before--it's perfect for stuffing peeking out of the sleeves and pant legs of scarecrows, cornstalks, witches' brooms, barnyards, and stables. It's the original "eco-friendly" thread, and much less expensive than bamboo or soy fibers. It's readily available at crafts stores across the country, and I'm sure your LNS would forgive this one transgression! But it's not always the easiest "thread" to use, so I thought I'd pass along a few tips to make the experience more enjoyable.

First: Switch to a larger needle than you'd normally use. The "Gifts" design was painted on 18 ct. canvas, for which I use a size 22 needle. I changed over to a size 20 to stitch the raffia--it's gentler on the strand of raffia passing through the eye of the needle and also enlarges the canvas holes so it's easier to pull the strand through.

Second: Be picky in choosing the strands you'll use. There's an awful lot of raffia in a two-ounce package, so you can afford to be picky! You'll want to select strands that are softer and approximately the thickness of other threads you'd use on the canvas. Avoid brittle strands, which can easily crack. If you notice any fine "hairs" along the strand, strip them away before stitching--they'll probably poke through as you stitch. And be sure to use short lengths to minimize wear-and-tear on the straw.

Third: Stay loose! Pull the strands gently through the canvas, both on the front and back. If a strand looks like it's starting to fray, end it off on the back of the canvas and start another strand.

Fourth: Stitch the raffia on top of areas previously stitched. If the straw should crack several years down the road, you'll still see stitched areas rather than bare canvas and the ornament won't be ruined.

If all of these admonitions sound like too much effort to use raffia, consider this: how many of us struggle with slippery rayon threads and persevere, because the final effect the thread produces outweighs the difficulties? I'm really happy with the way this canvas turned out--the juxtaposition of sparkly gifts against the simplicity of straw was exactly the look I was going for!

Monday, December 7, 2009

All but the hay


All three gifts are finally stitched, and the star has re-appeared in the sky!

Frankincense was a multi-step process, using Kreinik #12 tapestry braid in #001 and #025.
The top of the vessel was worked in a satin stitch and the neck was stitched in braided knitting. For the body, I stitched a framework with the gray metallic and inserted silver cross stitches. I then added another row of braided knitting and finally a row of slanted gobelin stitches over two threads.

Myrrh was also stitched in two shades of Kreinik #12 tapestry braid: #221 (copper) and #2122 (curry). The rim and base were worked in gobelin stitch over two threads, while the neck was worked in satin stitch. The body was stitched in basketweave with the curry metallic. The motif was centered by a Leviathan stitch variation over three threads, with half Scotch stitches at its four corners--all in the copper metallic.

The star was worked over the Petite Very Velvet sky with Kreinik #12 tapestry braid #202HL.

All that remains now is for me to stitch the hay back in, and I'm done!

Saturday, December 5, 2009

One down, two to go


Boy, it's tough sneaking in some stitching at this busy time of year!

The star has now totally disappeared in the sky as I plod along with the navy Petite Very Velvet. The chest of gold is also finished. Tent stitches in Kreinik #12 tapestry braid #002V outline the sides, with slanted gobelin stitches over two threads forming the straps in the center. The lock is a combination of two oblong cross stitches--the first worked vertically, and the second worked over it horizontally.

At this point, you may well be thinking that this is shaping up to be a rather dark Christmas ornament. But consider that some of the sky and most of the brown earth at the bottom of the canvas will be covered later by the hay, and I promise the star will re-appear!

I paid a visit to my LNS and obtained the silver and copper threads I need for the other two gifts. In between placing ornaments on our Christmas tree, I'm auditioning various stitches on some doodle canvas so I can bring these elements to life!

Friday, December 4, 2009

First you see it, then you don't


"Hey, where did the hay go?" you may well ask. I stitched over it, using DMC cotton floss #898 in basketweave, for several reasons.

First, I wanted the straw to be padded to give it added dimension. Also, I'll be working the straw in long stitches, and it's much easier to stitch over the basketweave than it is to insert tent stitches around the long ones later. There's one more good reason for the underlayment, but I'll get into that when I actually stitch the straw as the final step.

You'll notice the star is also disappearing behind the navy Petite Very Velvet I'm using, again in basketweave, to stitch the sky. I'll go back later and stitch the star directly over the PVV.

I want each of the "gifts" to look aged, so I rummaged in my stash for a thread that closely resembled weathered wood for the chest of gold. I chose Felicity's Garden "Fawn," a silk/wool blend about the weight of crewel wool, working it in slanted gobelin stitches over three threads. I have the gold thread for the trim on the chest, but deliberately didn't stitch it yet so you could better see the nice loft created by the Felicity's Garden. This gives the chest some added dimension, too, so it won't get lost in the hay later on.

Now I'm off to my LNS to purchase some "aged" silver and copper for the other gifts!

Wednesday, December 2, 2009

Simple gifts


It's only December 2, but already I'm getting bummed by advertisements on TV and in print, hyping the "latest and greatest" in holiday gifts. What child could possibly want a motorized hamster, for instance, when the little tyke could have the real thing? And in this economy, ads showing luxury sedans with big red bows on their roofs seem sadly out of taste.

So I was inspired to "go back to the basics" in my newest design, called simply "Gifts." It incorporates the traditional gifts of the Magi--frankincense, gold and myrrh--nestled in the straw of a stable against the background of a night sky, holding the promise of a single star.

I'll be stitching this with well-known threads--and a not-so-common one, so do come back and check my progress in a couple of days!

Tuesday, December 1, 2009

Under the radar screen


Over the past couple of weeks, I've been stitching on another canvas between projects. And yes, Virginia, it's another ornament for the 2010 Christmas dining room!

When Judy Harper showed some of her shell designs on her blog (www.fairy-crafts.blogspot.com) a month or so ago, I decided one of these would be ideal for the DR collection. A stitched shell on Cape Cod might sound a little like bringing coals to Newcastle, but adding a different shape to what I've stitched so far appealed to me.

When the canvas arrived and I took a better look at it, I came to the conclusion that the only way I could do justice to the design was to basketweave the whole thing. The trick, however, would be to keep it from looking flat and lifeless--and here's where having different pastel threads already in my stash came in handy!

The five main "ribs" of the shell were stitched with DMC cotton floss #819, with DMC floss #818 on either side and at the bottom. The darker "ribs" were stitched with Fleur de Paris fine mesh velour to add some texture, while the "bling" factor was added with Kreinik #12 tapestry braid #092.

Dressing up the shell are "pearls" outlined in Kreinik #12 tapestry braid #002V. The large "pearls" were worked in a Leviathan stitch variation and the smaller ones in Smyrna crosses, both using Kreinik #12 tapestry braid #032.

This canvas makes a good case for the "Know when to hold 'em, know when to fold "em" aspect of needlepoint: there are times when basketweave is the only game in town. I'm as big a fan of decorative stitches as the next person, but in this instance, "fancy stuff" would have ruined the lines of the design.

Saturday, November 28, 2009

The Cape Stitcher has a birthday


You've heard the saying many times: "My, how time flies when you're having fun!" A year ago today, The Cape Stitcher made its debut in blogdom. Pierre the Penguin and I offer many thanks to all of you who have visited, occasionally as well as regularly, to follow my projects in progress!

In reading the blogs of other folks, I've noticed two things different about this one. First, I don't have a "blogroll" listing the contributions of others who are equally passionate about needlepoint. My response to frequent queries about this absence is simple: I don't want to take the risk of leaving someone out and hurting anyone's feelings!

I also don't have a "completed projects" list--I sure wish I were computer-savvy enough to add this, and perhaps in time I'll catch on! So, in the meantime, I scrolled through the 167 posts of the previous year and compiled a list of everything I've stitched--and finished--since Nov. 29, 2008.

My own designs: 10 lighthouses (bringing the total number to 86); four "Eggs for All Seasons;" three mini-socks; three angels; and one Penguin. Then there's the crazy- quilt box-lid insert, the Halloween door-hanger "Dreamgirls," and the model for a Lobsterman stand-up. I adapted two original pieces of artwork for needlepoint: my father's pen-and-ink drawing of Central Park, which launched the blog, and a Kyrgyz pillow from a textile fragment.

Collaboration: An underwater scene, with fish designs provided by Judy Harper.

Canvases designed by others: Mindy's "Country Christmas" pillow and a Zellig tile design by Jan Fitzpatrick. I stitched the models for two designs by Gail Hendrix--"Nippon Textures" and the "Sweet Tooth" gingerbread house--as well as three more of her ornament canvases for myself.

I counted them all and discovered I'd finished 34 projects in one year. Gee, guess I'm not a slacker after all--and I sure do love to needlepoint!

New meaning to "vegetation"!


With the addition of greenery, the Jupiter Inlet lighthouse is now finished!

The grass was worked in a diagonal horizontal cashmere stitch using one strand of Impressions "Emerald," an over-dyed thread that provided built-in shading at the base of the lighthouse. The fronds of the palm tree on the left were formed by a satin stitch with one strand of Wildflowers "Moss."

I had the leaves of the trees on the right to stitch as well as the bushes in the foreground, and I wanted to use French knots for each while still keeping the trees in the distance. I chose a thinner silk/wool blend thread--Sheep's Silk "Green Leaves"--and stitched the trees in a single strand with one wrap. By working a French knot over each canvas thread, the Sheep's Silk became compacted and each knot less pronounced.

On to the bushes--and a veritable vegetable soup! On the left, I used a single strand and one wrap of Silk & Ivory "Spinach"; on the right, I chose Silk & Ivory "Broccoli." Using a thicker silk/wool blend and stitching over every other canvas intersection produced plumper and more distinct French knots suitable for a foreground.

Tomorrow--a celebration!

Friday, November 27, 2009

A very red lighthouse!


One of the things I was thankful for yesterday was the fact that my eyes are better than I thought! I grabbed the wrong glasses--for distance, not close-up--on the way out the door for a two-hour trip to Boston. But somehow I managed to make some progress on the Jupiter Inlet lighthouse anyway.

The lantern room and railing below it were stitched with black DMC #5 perle cotton to set these areas off a bit from the background. The railing supports were worked in a satin stitch with DMC floss #644. The bright red tower itself was stitched with DMC floss #817 in basketweave. The tiny window is a single cross stitch in DMC floss #317; the same thread was used in a diagonal vertical cross stitch for the panes of the larger window. Kreinik #12 tapestry braid #202HL in tent stitch was used for the beacon.

I also added the tree trunks: in DMC #5 perle cotton #801 for the palm tree on the left, and DMC #5 perle cotton #938 on the right. More perle cotton--#842--was used for the path at the base of the tower.

At this point, only the greenery remains to be stitched, but I see a lot of French knots in my future!

Wednesday, November 25, 2009

The sky's my limit!


For stitching, that is, before Thanksgiving Day! I'll spend almost four hours in the car tomorrow, up to Boston and back to share a holiday meal with No. 2 son, a victim of "Black Friday" who couldn't make it home for the traditional feast.

I just finished needle-blending the sky for the Jupiter Inlet lighthouse. Believe me--needle-blending is not something you want to attempt in a car. All those plies of DMC cotton floss, in different shades, floating around and likely to get mixed up--it's not a palatable thought! So I picked out my color family and started in with DMC floss #3755, in four plies, from the top of the canvas to the black railing below the lantern room. I then used the following "recipe," in intervals of six threads deep, to reach the horizon line:

Row 2: DMC #3755-3 plies; DMC #3325-1 ply
Row 3: DMC #3755 - 2 plies; DMC #3325-2 plies
Row 4: DMC#3755-1 ply; DMC #3325-3 plies
Row 5: DMC #3325-4 plies
Row 6: DMC #3325 - 3 plies; DMC #3841 - 1 ply
Row 7: DMC #3325 -2 plies; DMC #3841 - 2 plies
Row 8: DMC #3325 - 1 ply; DMC #3841 - 3 plies
Row 9: DMC #3841 - 4 plies

I've pulled threads for the lighthouse and some of the scenery, which I'll be able to work on in the car fairly easily. So next time, hopefully, I'll have some progress to share!

Meanwhile, I hope everyone has a wonderful and safe Thanksgiving Day!

Tuesday, November 24, 2009

By Jupiter!


Thinking ahead to my next trunk show in March 2010 at Needle Nicely in Vero Beach, Florida, I've decided to adapt the Jupiter Inlet lighthouse as my next project.

The site for the lighthouse was originally surveyed by Robert E. Lee; a design was submitted in the mid-1850s by Lt. George Meade of the Bureau of Topographical Engineers. Ironically, these two men would meet less than 10 years later as commanders of opposing armies at the Battle of Gettysburg, with then-General Meade emerging as victor.

Construction of the lighthouse under Meade's supervision did not go smoothly. An uprising of members of the Seminole tribe halted work until 1858. The Jupiter Inlet then silted over, causing stagnant water to accumulate around the site and creating a breeding ground for mosquitoes. "Jupiter Fever," a cross between malaria and yellow fever, ensued and brought about a considerable loss of lives.

Finally in 1860, the tower reached its height of 125 feet and a first-order Fresnel lens, with a characteristic flashing white light visible from 25 miles away, was lit. The light was extinguished little more than a year later when raiding Confederate soldiers stole the lens and hid it in a nearby creek. It was reinstated in 1866.

Various restoration projects at the lighthouse occurred in subsequent years, but it wasn't until 1999-2000 that a major renovation took place. Excavating the hill upon which the lighthouse stood, an incongruous 46-foot elevation in an otherwise-flat terrain, workers uncovered shells and pottery fragments. Archeologists later determined the artifacts were remains of a Native American colony dating to circa 700 A.D.

A grant made possible by the economic stimulus package was designated just this year for the lighthouse and surrounding land, and will be used for lighthouse maintenance and habitat restoration. So the bright red tower will once again undergo a facelift!

Sunday, November 22, 2009

Getting ready for Turkey Day


If you're anything like me, you're wondering whatever happened to August?! There are only four days left until Thanksgiving, and--scarier still--one month and three days until Christmas!

To get myself in the holiday mood, I dug out my "Autumn Glow" egg, a crazy quilt design featuring colors and motifs of the season. The "backbone" of this egg is a wonderful thread--"Autumn Bouquet" Sheep's Silk by The Thread Gatherer, one of my favorite silk/wool blends. It forms the basis for the segments at one, four and seven o'clock.

The rest of the egg was stitched in DMC cotton floss, Kreinik #12 tapestry braid, and Petite Very Velvet--all in basically simple stitches that, by virtue of the colors chosen, still pack a punch!

Very little stitching for me today! I'm off to wash and iron my kitchen curtains!

Saturday, November 21, 2009

Three down, ? to go

This pink and green version of my "Gretchen" egg is all finished and ready to join the two pastel mini-socks for next year's dining room Christmas decorations!

It took very little time to stitch the one remaining ribbon--the center horizontal one--to wrap up this project. I used the DMC floss #503 which already formed its edge and DMC floss #3733 in mosaic stitches surrounding Scotch stitches in DMC floss #819.

Am I "hooked" on mosaic stitches? Not really, although I seem to have done quite a few of them lately! But the mosaic stitch is such a tidy way to work areas covering an even number of stitches, and can form interesting patterns in combination with other stitches. I've used it to form hearts, flowers, checks, plaids, wreaths and Christmas trees. It's a stitch that's easily mastered and looks good using any number of different threads.

At some point, I'll probably stitch another egg-shaped ornament to add to this collection, but I'd like to include ornaments in different shapes as well. Hmmm....I'll have to think about that one!

Friday, November 20, 2009

Another day, another ribbon


I finished framing the Scotch stitches in the window-pane check ribbons, using DMC floss #3731. The egg is starting to take on a more contemporary look, but that's okay with me. I like to mix different styles, and when you're dealing with Christmas ornaments, almost anything goes!

I moved on to the plaid vertical ribbon, using the same pinks from the floral ribbon but reversing the positioning of colors. The darker pink is on the inside of the plaid, highlighted by Kreinik #12 tapestry braid, with the lighter pink forming the edges of the ribbon. The green in the plaid is DMC floss #3816, one value darker than the green in the window-pane check and two values lighter than the edge of the center horizontal ribbon.

One more ribbon to go, and I'll have myself another ornament!

Wednesday, November 18, 2009

Stitching woven ribbons


There's no hard-and-fast rule to stitching a woven ribbons design: I'm sure everyone has his/her own way of doing it. I always begin with the background--in this case, some green Fleur de Paris fine mesh velour I had in my stash. Unfortunately, this thread is no longer manufactured, but Petite Very Velvet works just as well.

My next step is to stitch the edges of the ribbons. The "window pane" check ribbon was worked in DMC floss #504 in a gobelin stitch over three threads; the vertical plaid ribbon was edged in DMC #5 perle cotton #818 with the same gobelin stitch. To add a little "bling" to the middle horizontal ribbon, I first stitched a single row of Kreinik #12 tapestry braid #002V, then added DMC floss #503 in a gobelin stitch over two threads.

Now to the floral ribbon that's been completed. I first stitched the edge in DMC floss #3354, then filled in the background with mosaic stitches using DMC floss #818. The "flowers" were also worked in mosaic stitch with DMC floss # 3354 and #3733, with the centers filled in with Kreinik #12 tapestry braid #009 in Smyrna crosses.

I moved on to the framed Scotch stitch that makes up the window-pane check--I'll fill in the framework next. This particular design has what I call a "built-in" stitch guide: while the design could be worked entirely in tent stitches and look just fine, the pre-determined stitch count lends itself to decorative stitches that add a little interest to the finished product.

Monday, November 16, 2009

In the spirit of Christmas Future


Yes, I DO tend to think ahead. And yes, when I get what I think is a bright idea, I'm like a puppy with a bone.

I was so pleased with the way my pastel mini-socks turned out recently, I decided to try my hand at an egg-shaped ornament to go with them to decorate my dining room--for Christmas 2010! I decided to re-do the "Gretchen" egg (right) in pinks and greens, adding a bit of "bling" just for Christmas. The final product won't be all pink and mint green--I'll need to choose different shades from color families in my stash to make the woven ribbons more interesting.

A stitching buddy in Wisconsin asked me recently if I would "walk through" my stitching of an egg, and this seemed to be the ideal opportunity. So here goes!

Saturday, November 14, 2009

Final touches on the Zellig tile


With only the center section to go, it took very little time to finish stitching Jan Fitzpatrick's Zellig tile design!

The third and lightest shade of red in the "arrows" and center medallion were stitched with DMC floss #304; the "starburst" was worked with DMC floss #823. With the exception of the brown inner framework, stitched in basketweave, all of the design was executed with mosaic stitches to imitate the look of a mosaic tile.

It's my personal opinion that one of the tests of a good design is its ability to transcend the boundaries of color choices--Jan's design does just that. I chose bold colors, whereas the definitive version Jan is stitching has a much more delicate color palette. Each version works, depending on your taste and color scheme, and the classic lines of the design would fit in well with virtually any decorating style.

Thanks, Jan, for the opportunity to stitch this one--it was great fun! Now I can sit back and watch Jan's interpretation at www.threadmedley.wordpress.com.

Friday, November 13, 2009

On the home stretch


With the addition of DMC floss #434 in basketweave for the brown inner framework, the design of the Zellig tile is really coming to life!

I also finished the ivory background, using mosaic stitches with a little bit of compensating. I then added the "arrow" motif at 2, 4, 8 and 10 o'clock with DMC floss #815.

Only two more colors to go! I'll use the lightest shade of red for the remaining "arrows" and the center section, and navy for the "starburst." I should be able to wrap up this project tomorrow!

Wednesday, November 11, 2009

More Zellig tile progress


I've finished the gold framework and filled in the remaining sections of deep red and medium blue-- now this piece definitely looks like a tile!

To treat myself, I added the "floating triangles," using DMC floss #322 in mosaic stitch. Four colors are now finished; five more colors, including the ivory background that's almost completed, remain.

Next up: the inner brown framework! I'll need to deviate from mosaic stitches in this area. Because of the number of threads I allotted, one half of the design would actually look like basketweave if I were to compensate mosaic stitches, so I've decided to give up gracefully and do basketweave stitches throughout. Would you believe micro-mosaic?

Monday, November 9, 2009

Working clockwise


Stitching merrily away with the gold floss, I finished the framework of the third quadrant on the Zellig tile design.

After filling in the deep red and medium blue sections in this area, it was time to celebrate with a new thread for the background: DMC floss #822, an ivory shade. To remain consistent with mosaic stitches, it was necessary to move the blue "floating triangles" over and down one thread before stitching the background.

Once I finish the gold framework, it will be decision time on how to stitch the brown inner framework.

Saturday, November 7, 2009

A bit more color


As usual--for me, anyway--I'm dangling a carrot in front of the horse as I stitch away on the Zellig tile design by Jan Fitzpatrick.

When I finished stitching a little more of the framework, I treated myself by adding another color: DMC floss #311, the middle value of the three blues I'll be using in this piece.

No more color for me, though, until I finish another quadrant of the gold framework! But even at this point, it's starting to get exciting--it actually is beginning to look like a tile.

Friday, November 6, 2009

Establishing a framework


My version of Jan Fitzpatrick's Zellig tile is very different from hers in terms of color: Jan's palette looks like a breath of spring, with soft greens and tans on a marbled canvas, whereas I'm using the jewel tones of an oriental rug.

I started stitching the framework using DMC floss #729--what I'd call an "old gold." To imitate the look of a mosaic tile, both Jan and I are using mosaic stitches as much as possible, and so far, so good!

When I finished up the first skein of gold floss, I treated myself to filling in a little--DMC floss #814, a deep burgundy which will be the darkest shade of red out of three. And I'm happy to report that so far, anyway, all the mosaic stitches are lining up nicely!

Do go visit Jan's blog (www.threadmedley.wordpress.com) to see how dramatically different a design can look in another colorway.

Wednesday, November 4, 2009

From mini-sock to Moroccan tile


My little sock was finished in practically no time at all! I followed through with the floral motif, using DMC floss #962 and #3716 for the pink centers. The only real decision involved how to stitch the square at the very center: mosaic stitch or French knots? I concluded French knots might be a little "fussy"--and I am not a "fussy" person--so stayed with the mosaic stitch. I'm happy with the result--the colors remind me a bit of coffee and French vanilla ice cream, my favorites!

Having practiced my mosaic stitches, I can move on to my next project: a Zellig mosaic tile adapted for needlepoint by Jan Fitzpatrick, who has done extensive research into Moroccan culture and crafts after living there for several years. Jan's rugs are magnificent--do go visit her at www.threadmedley.wordpress.com. She's currently showing the pattern for the Zellig tile in the colorway she'll be using for her version.

When I first approached Jan for her permission to blog-stitch this piece, I thought I would rotate it one-quarter turn to make a Christmas ornament for myself. Then I read Jan's post about her using as many mosaic stitches as possible to mimic the look of a real mosaic tile, and I realized I wouldn't be able to do that with a diamond shape. I found the perfect home for the finished piece--a Sudberry House "Laura's box" in a mahogany finish--so will work the project as Jan originally intended but in colors very different from hers.

Being the painted canvas person that I am, I had to mark the canvas first! This took a fair amount of counting, and I may need to adjust the positioning of smaller elements as I stitch, but I'm basically good to go. As you can see, the canvas is marked, not a full paint job--it's just for me and I'd much rather spend the time stitching!

Monday, November 2, 2009

Sock it to me again!


I tend to play "What if?" a lot when I'm working on a new design. When I finished the two versions of the "Victoria" mini-sock. a thought occurred to me: the pastel sample was in the exact same shades as some Christmas ornaments I'd purchased in our Texas days. Gee, if I had enough ornaments in that color scheme, I could re-do the decorations for the dining room! After three years of the same sugared fruit, I was ready for a change. It's too late for this year, obviously--I'll need a lot of ornaments to pull off this new decorating scheme--but if I start now, I'll have a leg up on next Christmas!

I loved the "lace" effect on the cuff of the darker "Victoria" sock, as well as the taupe Petite Very Velvet I'd used for the background of the pastel version. So why not combine the two? I "borrowed" the diamond motif of my "Harlequin" mini-sock and the mosaic-stitch floral motif from the center of my "In the Pink" Egg for All Seasons. Voila! A new mini-sock design which, as you can see, I wasted no time in stitching.

The cuff was worked with DMC #5 perle cotton #712, with a framework composed of tent stitches, diagonal vertical crosses and Smyrna crosses. Inside the diamonds I repeated the same color with DMC floss in compensated mosaic stitches, and have started to add the leaves--again in mosaic stitches, with DMC floss #501 and 503. Outlining the diamonds is Kreinik #12 tapestry braid #002V.

As you can see, this canvas is working up quickly! I hope to be able to show you the finished product later this week.

Saturday, October 31, 2009

A "spook-tacular" finish


Just in time for Halloween, stitching on the Point Lookout lighthouse is finished!

After adding the path using DMC floss #644 in a gobelin stitch, I worked the grass with Sheep's Silk "Green Leaves Dark" in Nobuko stitch. The bushes were stitched in French knots using Silk & Ivory "Ivy." The landscaping is complete!

Paranormal psychologists called in by the State of Maryland to investigate the strange doings in and around the lighthouse are not the only ones to have witnessed unusual occurrences. One such witness was Laura Berg, the last person to live in the lighthouse and the founder of the Point Lookout Lighthouse Preservation Society.

She, along with several others, participated in a seance in the lighthouse in the late '70s and was photographed during the event. The developed photo revealed the presence of someone unobserved by seance participants: the shadowy form, standing beside Laura Berg, of a man in a soldier's uniform, standing casually with legs crossed, who appeared to be leaning into the wall.

While still in residence at the lighthouse, Laura Berg awoke one night to the sight of six bright lights swirling on the bedroom ceiling. Detecting the smell of smoke, she rushed downstairs to find the space heater in the living room on fire.

Rangers at Point Lookout State Park have also had unexplained "encounters." One ranger going about his duties to secure the lighthouse for an imminent electrical storm reported seeing a young, clean-shaven man peering into one of the windows. When the ranger opened the door to investigate, the young man disappeared through the screening of the enclosed front porch. The ranger later learned that his visitor's appearance matched that of one of the passengers of the Express, a steamer wrecked on the Point Lookout shore during a similar electrical storm in 1878.

Gathering weather data along the beachfront, another ranger encountered an elderly woman, obviously agitated, who walked with eyes cast down as if looking for something she'd lost along the path. She shrugged off the ranger's offer of assistance and he continued on his way. When the ranger looked back a short time later, the woman had disappeared. Several weeks had passed when the tombstone of Elizabeth Taylor was discovered in one of the rooms of a local hotel. Records revealed that the Taylor family cemetery had been located on the same stretch of beachfront where the ranger met the old woman. Was it the spirit of Elizabeth Taylor, searching for her family members, that the ranger had encountered?

The Point Lookout lighthouse may not have been one of the most picturesque lighthouses I've adapted to needlepoint, but you have to admit its history certainly has been exciting!

Wednesday, October 28, 2009

Building the lighthouse


With the sky and water stitched, I started in on the Point Lookout lighthouse itself. I worked the tower in DMC floss #666 in a combination of tent and satin stitches, and the front porch in white DMC floss in tent, Scotch variation and gobelin stitches over two threads.

Stitching small architectural elements isn't always easy: you want to give a hint of how the different areas are constructed, but the size of the areas limits you to the types of decorative stitches that might be suitable. For the roof of the house itself, I used DMC floss #815 in a cashmere stitch to mimic overlapping shingles. The corrugated roof of the porch was constructed of DMC floss #355 in alternating vertical rows of tent and gobelin stitches over three threads.

The house itself is constructed of brick that has been painted a tan color, but the areas to be stitched were too small to use a decorative stitch that might suggest brick. Here I used basketweave in DMC floss #842, which keeps the overall look in scale and further accentuates the decorative stitches I did use on the roof sections.

Ann Davis, the keeper of the lighthouse from 1830 to 1847 whom I mentioned in my previous post, was not the only female keeper. Pamela Edwards, the keeper during the Civil War, must have been one tough cookie! In addition to maintaining her rigorous duties at the lighthouse, she was surrounded by doctors and patients at the Union Army hospital as well as a burgeoning population of Confederate prisoners-of-war. No wonder the laughing, female voice, cussing a blue streak, that paranormal investigators recorded has been attributed to her!

It is believed that at some point, Pamela Edwards was forced to house within the lighthouse itself several female prisoners who had been accused of spying or being Confederate sympathizers. The last employee of the State of Maryland, who lived with her husband in the lighthouse until 1981, complained of an unexplained smell of death and decomposition emanating from one of the upstairs bedrooms. She made numerous attempts to scrub the room, but each night the smell reappeared.

Paranormal psychologists brought in to investigate this phenomenon detected "vibes" of pain and suffering coming from the room. They finally decided the location must have been where the female prisoners had been detained, and once their report was made public, the smell suddenly disappeared. Did the ghosts of these prisoners feel vindicated and leave the lighthouse once their previous existence had been confirmed by experts?

I need to finish "landscaping" the lighthouse, and have a few more ghostly stories up my sleeve, before we slide into Halloween!

Monday, October 26, 2009

Needle-blending a gloomy sky


I began stitching on the Point Lookout lighthouse with the sky, which I wanted to be in keeping with a haunted lighthouse. I chose a gray-blue color palette of DMC cotton floss, starting at the top with four plies of DMC #932 stitched in basketweave. Randomly staggering the stitches at the bottom of each section, I followed this " recipe" down to the horizon:

Row 2: Three plies DMC #932, one ply #3752
Row 3: Two plies DMC #932, two plies #3752
Row 4: One ply DMC #832, three plies #3752
Row 5: Four plies DMC #3752
Row 6: Three plies DMC #3752, one ply #3753

I then added the water, using DMC floss #931 in a gobelin stitch over two threads. It was then time to work on the lighthouse itself, so I hopped on the computer to check the exact shade of red for the lantern room and tower. Some photos I hadn't seen before came up in my search, and I realized the roof of the house itself wasn't black: it was a red so dark that, in most of the previous photos I'd consulted, it had appeared to be black. Not to worry--I'll cover over that black paint with dark red when I get to the roof. I knew there was a good reason for my not painting a master for a lighthouse design until the model had been stitched!

In my previous post, I mentioned the study of ghostly activity, commissioned by the Maryland Committee on Psychic Research in 1980, which produced tape recordings of 24 different voices within the lighthouse. One of those voices, which distinctly utters the words "My home," has been attributed to Ann Davis, wife of the first keeper James Davis. When he suddenly died only two months after his appointment in 1830, Ann took over his responsibilities until her death in 1847. Her apparition, dressed in a long blue skirt and starched white blouse, at the top of the lantern room stairs has been documented by several people.

From 1971 to 1972, a young state employee, along with her husband and infant son, lived at the lighthouse. Each night she tucked the baby in for the night with his head at the top of the crib and, on one particularly chilly evening, clipped a blanket and top sheet down around the sleeping child. Halfway down the stairs to rejoin her husband, she heard the baby utter a blood-curdling scream. When she raced back to the bedroom, the child was sound asleep--at the other end of the crib, facing the opposite direction. His covers had been removed and the bed re-made so he'd still be snug in this new position.

Was it the benevolent ghost of former keeper Ann Davis who had taken it upon herself to rearrange the child? More stitching and more stories still to come!

Friday, October 23, 2009

A haunted lighthouse: believe it or not!


It has stood on the same spot for almost 180 years, but has been vacated for the last 30. Its beacon, the aid to navigation that provided the reason for its existence, was removed 44 years ago. But some folks say there's still a lot of activity going on at Point Lookout lighthouse in Scotland, Maryland, dubbed the most haunted lighthouse in the United States!

The grounds of Point Lookout State Park, at the mouth of the Potomac River where it meets Chesapeake Bay, haven't always been quite so desolate. Originally part of St. Michael's Manor owned by Leonard Calvert, first governor of Maryland while still a British colony, the spot was a mecca for visitors to its wharf and summer cottages when the lighthouse was built in 1830. With the coming of the Civil War, however, the area's charm as a summer resort dramatically changed.

In 1862, the federal government leased land on the point to construct Hammond General Hospital for the care of wounded Union soldiers. The following year, some Confederate detainees were assigned to the hospital. After the Battle of Gettysburg, however, Camp Hoffman--the Civil War's largest prison camp--was constructed on the site to house a maximum of 10,000 Confederate soldiers. By 1864 the population had exploded to 20,000. Conditions were squalid: drinking water was contaminated and make-shift tents provided little protection from the elements. More than 4,000 Confederate soldiers died and were buried a short distance from the camp.

Renovations to the original lighthouse were made in 1883 to allow space for two keepers' families and again in 1927, when it reached its present 2-1/2 story size. By the early 1950s, the U.S. Navy had begun buying parcels on the site and when the Coast Guard turned the lighthouse over to the Navy in 1965, the Fresnel lens was removed and a steel light tower was constructed offshore. After years of disinterest, the Navy did restore the lighthouse exterior in 2002, returning it to its original 1927 paint scheme, and the State of Maryland assumed ownership in 2006.

Oddly enough, it wasn't until the state took over the lighthouse that strange noises and sitings began to occur. Paranormal psychologists were brought in, confirming in taped recordings the existence of 24 different voices and documenting apparitions both in the lighthouse and on the grounds.

Whether you believe in ghosts or not, stay tuned for a little stitching and some interesting--and slightly spooky--stories about the spirits of Point Lookout lighthouse!

Thursday, October 22, 2009

An encore performance


The "Dreamgirls" are back--from the finisher, that is. I thought those of you who followed my progress in stitching this little Halloween door-hanger might be interested in seeing how it turned out.

The finishing was done by Stitchery Square in Camden, Maine, who turned this project around in plenty of time for the upcoming holiday. Once again, Michelle McCreery, a very sweet and talented lady, has worked her magic with black and metallic white cording and an over-the-top embellishment of sparkly orange and black-and-white ribbons and a little purple doo-dad for good measure.

Our across-the-street neighbors' renovation project is behind schedule, so perhaps this will cheer up the lady of the house!

Tuesday, October 20, 2009

A double-photo finish!


Both versions of the "Victoria" mini-sock design are now completed!

To finish the lace cuff on the mini-sock on the left, I added black Petite Very Velvet and Smyrna crosses to the squares made by the grid of DMC #5 perle cotton that I'd already established. Then I stitched the last ribbon motif, using white DMC floss in basketweave for the background, #991 in satin stitch for the holly, and #304 in a cross stitch for the berries. I chose not to use French knots for the berries because, as a model, this little sock will get a lot of wear-and-tear traveling around and single French knots could be too easily snagged.

I finished off the cuff on the right mini-sock and, again, had one more ribbon motif to complete. For the filigree ribbon, I chose DMC floss #819--a very pale pink--in basketweave for the background, Kreinik #12 tapestry braid #002V , and Kreinik #12 tapestry braid #032 for the "pearls."

So here we have the same basic design, with two very different color schemes and cuff treatments--I look forward to learning which version YOU like best!

Saturday, October 17, 2009

A touch of lace


I've been a busy bee this week, working on the two versions of my "Victoria" mini-sock design.

Yes, Cyn, I did go to the local fabric store, but don't get excited! I went to look, not to purchase. Lace, indeed, was on my mind, and I wanted to get an idea of the different styles to determine which ones would be best for the cuffs on the mini-socks. Bet you never realized how many different types of lace there are: crocheted lace, gossamer lace that looks more like netting, cotton with a starched, perky look--the list is virtually endless! And don't forget the different colors, too: pure white, ivory, and "blond." Having figured out which style and color would be appropriate for each version, I hurried home to stitch them!

As you can see from the photo on the left, the "darker" version really isn't that dark anymore. When I finished stitching three of the four ribbon motifs, I took a long, hard look at the canvas and realized the background of the fourth ribbon should stay exactly as I'd left it unpainted: white! As I began stitching the two upper ribbon sections in basketweave with white DMC floss, the strangest thing happened--the green on the "rosebud" ribbons appeared greener, and I decided it wasn't a bad thing at all as it softened the look of the "jewel tone" ribbons.

I finished the filigree ribbons on the "lighter" version, as you can see in the right photo, and then I got side-tracked--time to stitch some lace! I had already studied some needlepoint lace-making techniques outlined so clearly on Judy Harper's "Freebies" blog and knew essentially which styles would be suitable for each sock. To answer NC Pat's comment, I never planned to link the versions with a coordinating cuff color--I'm treating each version as separate but equal. Getting out my graph paper, I planned out the shapes of each cuff and the spacing of the grid which will eventually produce the lace itself. Believe me, this step took a lot longer than the actual stitching!

The sock on the left has a cuff of crocheted lace, using DMC #5 perle cotton. I tried it on doodle canvas first, with both the perle cotton and Kreinik #12 tapestry braid #032, and decided I liked the perle cotton best. I first established the "points" on the edge with diagonal oblong cross stitches, ending with a "drop" at each point worked in a variation of the Leviathan stitch three threads square. Next I filled in a grid that resembles the basis for a framed mosaic stitch. I'll go back and fill in the squares to create a pattern with the black Petite Very Velvet.

The cuff in the right photo is one-third completed, with the stitching of the grid begun in the center "festoon." I used the same DMC floss #712 that I'd used in the plaid ribbon to mimic the look of "blond" lace. The squares of the grid were filled in a pattern of the taupe Petite Very Velvet and Smyrna crosses stitched with the floss.

I still have ribbons as well as cuffs to finish, but I feel like I'm on the home stretch now. And I proved to myself that I could stitch lace, not just buy it!

Wednesday, October 14, 2009

More ribbons, more decisions


When I finished stitching the "jeweled" ribbons on the "Victoria" mini-sock on the left, it was time to re-assess the color situation. At this point, the color choice was heavily weighted toward reds, and I decided it was time to play up the greens a bit more.

So for the background of the "rosebud" ribbon, I chose DMC floss #504 for the background, stitched in basketweave, with DMC #991 for the leaves and DMC #304 for the flower buds in satin stitch. Using the pale green background pulled in the green from the plaid ribbon already stitched, and will tie in the green of the holly when I get to that ribbon.

For the mini-sock on the right, I wanted to strike a balance between light green and pink as well as brighten the colors here a bit. For the vertical "filigree" ribbon, I selected DMC floss #962 as the background, accented with Kreinik #12 tapestry braid #092. The pink shades tie in the rosebuds as well as the pink of the plaid and keep the overall design from looking too somber.

When I finish stitching these ribbons, I'll have only one more ribbon motif to mull over as well as the cuffs of both mini-socks. I'm thinking a trip to my local fabric store as well as my LNS may be in order!

Monday, October 12, 2009

Looking both ways


The two versions of my "Victoria" mini-sock design are now equal in stitching progress. Each has edgings for all the ribbons and one horizontal ribbon is complete.

For the mini-sock on the left, I chose DMC #5 perle cotton #498 and a dark green Fleur de Paris fine mesh velour for the edgings, each worked in a gobelin stitch over two threads. The "jeweled" ribbon was stitched in basketweave with DMC cotton floss #304 for the background and Kreinik #12 tapestry braid #008 for the "emeralds."

The edges of the ribbons of the mini-sock on the right were worked in Fleur de Paris pink fine mesh velour and DMC floss #503, again in gobelin stitches over two threads. The rosebud ribbon was stitched in DMC floss #504 for the background, #501 for the leaves and #961 in satin stitch for the flower buds.

I'll finish these horizontal ribbons on both mini-socks, then it will be decision time for colors on the other ribbons. The trick will be to keep the left sock from being too dark and the one on the right just bright enough!