Thursday, December 30, 2010

One dilemma solved


I figured out the solution to one problem: making the background of the Waltz of the Flowers canvas twinkle without being sickeningly sweet. Instead of using a pink metallic thread, for which the canvas was originally painted, I chose Kreinik #12 tapestry braid #201--a combination of gold and silver, which sparkles nicely in the pale green background without detracting from the dancers themselves.

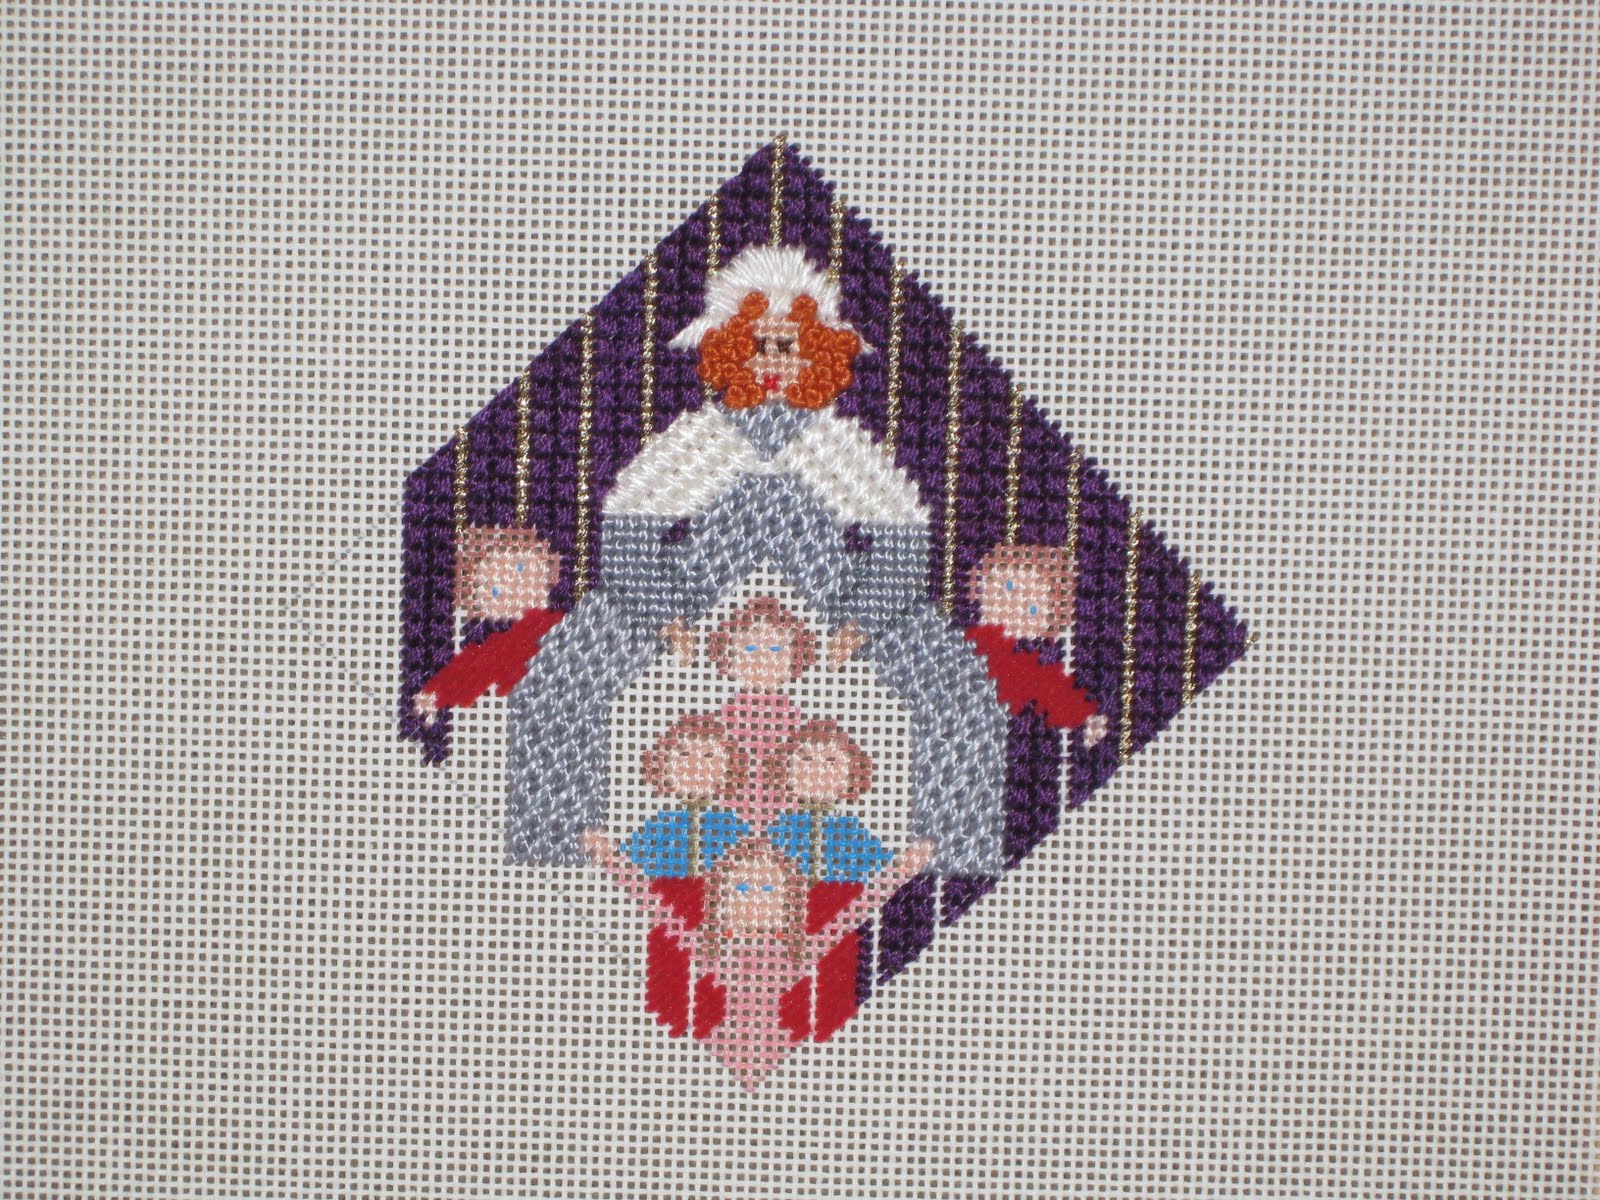
With the top part of the background done, I moved on to the dancers' hair, worked in satin stitch with three different shades of brown Burmilana. Then I added the leaves in their hair with DMC floss #501.

The flowers in their hair will have to wait until I've chosen the thread for the "petal" part of their costumes so I can pick just the right shade of pink. The petal thread has been added to the "stem" thread on my shopping list for my trip to my LNS!

Tuesday, December 28, 2010

Selecting a background color, or how not to lose an arm and a leg


DMC cotton floss is the backbone of my thread stash: I've used it in combination with Kreinik metallic threads for the backgrounds of all my ornaments to date in the Nutcracker series. But sometimes, as with the Waltz of the Flowers ornament, color choice of floss can be tricky. I wanted this ornament to look very feminine and in pastel colors of pink and green.

The choices of floss for skin tones are somewhat limited, which made my selection of a background color even more important. Had I used a pink background, I ran the risk of either watching the dancers' arms and legs disappear or switching to a flesh tone that made them look jaundiced. So I opted for a pale green--DMC floss #504--for my background and a healthy pink DMC floss #948 for the skin tone.

Now that half of the background has been stitched, I can see that the pink I used to paint the filigree pattern won't work--I'm looking for a twinkle but I don't want the finished ornament to look like a bonbon. Yet another instance where I'm glad I don't paint a master for a design until after I've stitched the model--I can work out any kinks as I go along!

I raided my stash for the "stem" section of the dancers' costumes and found Silk & Ivory "Willow," which blended well with the background. The loft of the S & I provided the high profile I was looking for, but I'm not quite satisfied with the overall effect. Being a 50/50 silk/wool blend, the S & I provided the sheen I was looking for, but it's looking a bit too "woolly" to me. I think a trip to my LNS is in order to see if there's a more appropriate thread for the costumes!

Sunday, December 26, 2010

Waltzing flowers


Christmas Day is over. The dishwasher is still churning, the crumpled gift wrap has been hauled away, and the refrigerator is bulging with leftovers. But the spirit of the holiday continues as the strains of Tchaikovsky's The Nutcracker can still be heard at our house!

The next ornament in the series based on the ballet that I'll be working on is the Waltz of the Flowers. I've danced this divertissement from Act II twice, many years ago. Each time the costume I wore was basically the same: a green "stem" bodice over a pink "petal" skirt. So this is how I've garbed my three little dancers, adding wreaths of flowers for their hair.

I'll need to choose a background color that contrasts sufficiently with the skin tones of the dancers, and I'm having second thoughts about the pink filigree pattern. So stay tuned to see how this one actually turns out!

Thursday, December 23, 2010

Sliding into Christmas


Just in time for Christmas, the Nutcracker himself is finished and ready to take on the Rodent Monarch!

His helmet and sash were stitched in basketweave with red Petite Very Velvet. His mustache and beard were worked in French knots with two strands of Burmilana.

I used black Petite Very Velvet for his belt and boots, and all the gold trim on his helmet, uniform and boots were worked with Kreinik #12 tapestry braid #002. As a final touch, I gave his helmet a plume by working Petite Peluche in tent stitches which I then "roughed up" with the tip of my needle.

Now I've got some holiday baking to do, so I'll be back after Christmas with the next installment of my series based on The Nutcracker ballet. In the meantime, I wish you and yours a very merry Christmas!

Monday, December 20, 2010

Decorating the tree


I began stitching the Nutcracker canvas with the little fellow's white uniform. His jacket was worked in mosaic stitch and his pants in a slanted gobelin stitch over two canvas threads, both using white Trio.

His face and hands were stitched in basketweave with DMC cotton floss, and his "chops" were worked in tent stitch, again with DMC floss.

On to the tree background! I was looking for a stitch that would resemble the needles on a tree without creating too high a profile. I turned to a stitch I've used quite a lot for stitching trees in the background of lighthouse canvases--diagonal upright oblong cross--using four plies of DMC floss #991. I'm using Kreinik #12 tapestry braid #002 to fill in the "garland" as I go along.

This little fellow is working up quickly and should be finished long before he makes a grand appearance on Christmas Eve!

Saturday, December 18, 2010

The title character


Years and years ago, DH and I attended a performance of The Nutcracker by the New York City Ballet at Lincoln Center, which was probably the most elaborately staged production I've ever seen. Two scenes from Act I still stand out in my mind.

The first takes place after the holiday party guests have departed and the family retires for the evening. Before the wondering eyes of the audience, the Christmas tree begins magically to grow larger than life.

My second recollection is the moment after Clara has dispatched the Mouse King with a well-placed toss of her shoe and the Nutcracker is transformed into a handsome prince. The "break-away" costume for that production was designed by Kermit Love, one of the original collaborators with Jim Henson in creating The Muppets.

So in designing the title character for my Nutcracker series, I was inspired by these memories. I didn't want a garish creature who didn't have a prayer of eventually turning into a handsome prince, and I wanted to pose him in front of that awe-inspiring tree. But no self-respecting tree would appear in public without a little garland! So the first thing I'll be doing before I start to stitch this canvas will be to add a little gold to the background so that dense green looks more like a stylized Christmas tree.

Thursday, December 16, 2010

Enter His Royal Mouseness


The Mouse King is fully clothed and ready for his performance!

His crown was stitched with Kreinik #12 tapestry braid #002L, the holographic gold, using a slanted gobelin stitch over two canvas threads for the base and adding "jewels" of Smyrna crosses with Kreinik #12 tapestry braid #003. The rest of the crown was tent-stitched, adding French knots at the very top.

Using the same gold Kreinik braid, I tent-stitched the chain of his cape and edged the front of his jacket with braided knitting. The cape was stitched in basketweave with Petite Very Velvet V631.

With one arm directed downward and the other raised, his jacket called for a non-directional stitch. So I worked this area in a Nobuko stitch using Vineyard Silk Classic "Deep Wisteria." His ruffled shirt front peeking out of the jacket was stitched in French knots with white DMC cotton floss.

Using the gold Kreinik braid, I worked the top of his sword in a Smyrna cross and the hilt in slanted long stitches. The blade was worked in a diagonal mosaic stitch using Kreinik #12 tapestry braid #001.

Last, but not least, I added long stitches on top of his face to create whiskers, using two plies of DMC floss #310. The Mouse King is now ready to do battle with the Nutcracker, the subject of the next canvas in the series that I'll be stitching!

Tuesday, December 14, 2010

Moving right along


With the background completed on the Mouse King canvas, I started working again on his body. As you may recall, I'm using two strands of gray/brown Burmilana in basketweave.

The inside of his ears were worked in a satin stitch with pink DMC floss. His eyes were formed with Smyrna crosses using Kreinik #12 tapestry braid #005. I generally dislike using metallic thread stitching human eyes, but in the case of the rodent monarch it seemed appropriate.

His nose/snout was stitched in basketweave with black Petite Very Velvet to raise it above the rest of his face. For his pearly white teeth, I used white DMC Satin floss in slanted gobelin stitches over two canvas threads.

He'll eventually get whiskers, too, but I'm waiting to add them on top of previously worked stitches when I've finished giving the King some new clothes!

Sunday, December 12, 2010

Subtle glitz


I was looking for a fairly subtle background for the Mouse King, one befitting his regal stature without taking away from his larger-than-life persona. I decided on a striped background again, this time alternating slanted gobelin stitches over three canvas threads in DMC floss #762 with tent stitches of Kreinik #12 tapestry braid #001.

Another important selection was that of the thread for the mouse himself--not quite gray, not quite brown, and with a bit of a furry look. In my stash, I found some thread "imported" from Texas--Burmilana #3504H--which has a heathery look that fits the bill perfectly. I've used two strands in basketweave so far to stitch his head and one paw.

I'll finish up the background, then start giving him some facial features to make him look a bit more dashing!

Friday, December 10, 2010

The Big Cheese


It would be impossible to design a series of ornaments based on The Nutcracker ballet without including the Mouse King. His battle with the Nutcracker in Act I is the catalyst for the dream sequence which continues through the second act of the ballet. It was the one ornament I dreaded designing, however, for a simple reason: I loathe mice!

Living in Connecticut for so many years, and now in Massachusetts, it's inevitable that the occasional field mouse will make an unwanted appearance. DH and I have had a long-standing agreement: he gets rid of the mice and I get rid of snakes. Yes, we had several slithering visitors when we lived in Texas!

Gritting my teeth, I began with his pose--one arm raised in a call to battle--dressed him in royal purple and gave him a regal crown. By the time I was finished, I actually liked the little guy, and look forward to bringing him to life!

Thursday, December 9, 2010

Jumping for joy!


Little Tea, the Chinese dancer, is jumping for joy because he's finally ready for his performance!

Raiding my stash for a thread suitable for his jacket and pants, I could only come up with Silk & Ivory "Red Hot"--the perfect color, with enough loft to make the figure stand out from the background, but a tad tight on 18-count canvas. I would have preferred Trio here, but decided to make do with what I already had. The jacket was worked in a framed mosaic stitch and the pants in Nobuko stitch. The frogs on his jacket were worked in horizontal oblong cross stitches with Kreinik #12 tapestry braid #002.

For his ballet slippers, I used black Petite Very Velvet. The hair inside his hat was worked in tent stitches, with the long queue stitched in braided knitting.

I'll be going back to Act I of The Nutcracker for the next ornament in the series--one I dreaded designing but which is fast becoming one of my favorites!

Wednesday, December 8, 2010

The bling factor


I've finished the background for Tea, the Chinese dancer, and sincerely doubt this ornament will get lost on a tree!

When I had stitched the grid of cashmere stitches, I filled in the tent stitches with Kreinik #12 tapestry braid #203--a color the Kreinik folks call "Flame." It's a combination of gold and red, which tones down the DMC floss #873 used for the cashmere stitches as well as highlighting the red of the dancer's costume.

Now to work on the costume itself and give the poor little guy some hair!

Monday, December 6, 2010

Establishing a background pattern


For the background of little Tea's canvas, I wanted a pattern that would accentuate the horizontal line of both his body and the ornament shape itself. A search through my stitch books revealed nothing of interest, so I decided to wing it and came up with a combination of stitches that seems to have done the trick!

Using DMC floss #873, I'm working a series of cashmere stitches--five canvas threads wide and two threads high--that will be intersected by a row of tent stitches. The profile of the cashmere stitches is fairly low, so won't intrude on the central figure.

But before I began the background, I stitched his face with DMC floss in basketweave and gave him his little coolie hat. I used DMC #5 perle cotton #739 for the hat, first turning my canvas 90 degrees to lay long stitches every other slanted row, then righting the canvas to work more long stitches in the opposite direction. I'll come back to stitch his hair when more of the background has been completed.

Sunday, December 5, 2010

Time for Tea!


Another divertissement, or independent dance, from Act II of The Nutcracker is that of the Chinese dancer, symbolizing Tea. The male who traditionally plays this role requires the agility and stamina of a gymnast as well as the grace of a dancer. His performance is punctuated by a series of fantastic leaps, which inspired the pose for this ornament.

I've worked out an elongated diamond as the shape of this ornament to accentuate the lines of the dancer. The pattern for the background will hopefully reinforce the horizontal orientation.

This little guy should be a fun stitch, so do come back and watch my progress!

Saturday, December 4, 2010

The gang's all here!


Mother Ginger and her brood are ready for their performance!

After stitching the inside of Mother Ginger's hoop skirt in basketweave with DMC floss #414, I began dressing the children with red, blue and pink Petite Very Velvet. The little blue jackets were trimmed with Kreinik #12 tapestry braid #002.

For their hair, I used various shades of brown Burmilana. Normally I'd use two strands on 18-count canvas, but here I used three for some additional loft. All of the hair was worked in a satin stitch, with braided knitting used for the braids on the little girl in the foreground.

My next canvas will be another character from Act II, so stay tuned!

Thursday, December 2, 2010

Yikes, stripes!


I've made good progress on the background of Mother Ginger--enough so to reaffirm my decision to use a dark color here to make the characters "pop."

Mother Ginger herself has now donned a wig, stitched in French knots with Silk & Ivory "Pumpkin." And I've started dressing the children, changing the color of the shirts on the two munchkins peeking behind her dress from blue to red to contrast better with the purple background. The shirts and pants at the bottom were stitched in basketweave with red Petite Very Velvet. The children's faces and hands have also been stitched with DMC floss #948.

I'll be stitching the inside of Mother Ginger's hoop skirt next, so I can finish dressing the kids and give the poor little tykes some hair!

Tuesday, November 30, 2010

Dressing Mother Ginger and celebrating a blog birthday


Most of us have heard the expression "My, how time flies when you're having fun." It's hard to believe that The Cape Stitcher is two years old today! My thanks go out to all of you who have taken the time to visit and watch my progress in bringing painted canvases to life!

Now to Mother Ginger! I've made my color choices, and not for the first time am I glad that I never paint a master for a design until I've stitched the model. Mother's cap and shawl remain white, worked in satin stitch for the cap and diagonal mosaic stitch for the shawl using Vineyard Silk "Bright White." But I've changed her dress to a gray, using DMC #5 perle cotton #318 in a Nobuko stitch for the bodice and hoop skirt and tent stitch for the sleeves, which are outlined in DMC floss #444. Her face has also been stitched in basketweave with DMC floss #950.

With these elements in place, the color choice for the background became clear: a royal purple to set off the colors of the other costumes, intersected by vertical lines of gold metallic to emphasize the vertical composition of the design. I'm using DMC floss #550 in rows of side-by-side mosaic stitches and Kreinik #12 tapestry braid #002 for the gold stripes.

A good start! Now I'll work from top to bottom, adding background and costumes as I go.

Sunday, November 28, 2010

Act II, continued!


Next up in my new series based on The Nutcracker ballet is Mother Ginger, the title character in the last divertissement, or independent dance, of Act II. Tchaikovsky based this character on the nursery rhyme Mother Gigogne, or the Old Woman Who Lived in a Shoe, and derived inspiration for the music from a French folk song.

Unlike the other entertainments provided at the banquet for Clara and the Nutcracker in the Land of Sweets, this one is a light-hearted frolic. The character of Mother Ginger, traditionally played by a man on stilts, lumbers onto the stage wearing an enormous hoop skirt and garish wig. At a musical cue, Mother opens the front of the skirt and an assortment of children--lucky members of the ballet company's school--scurry out and scamper around the stage.

When I worked up this design two years ago, the hardest part was including seven figures in a diamond-shaped ornament 4-1/2 inches high by 4-1/2 inches wide! Revisiting this canvas, I didn't change the composition, but I will need to make some decisions about color to make Mother Ginger and her brood come to life!

Friday, November 26, 2010

Exit stage right

Coffee, the Arabian dancer, has finished her performance!

With the background completed, it was time to add the final details to her veil. A couple of months ago, I had picked up some interesting new--to me, anyway--threads for a Sailor's Valentine that I was working on. I didn't use the thread for that project, but vowed to find a use for it, as the colors were so appealing.

To finish off the veil, I used DMC Color Illusions #5 perle cotton #4030 in a satin stitch. In some variegated threads, the space between color changes is too great to use in a small space, but this one was just perfect. No need to "cut and paste" the thread to achieve the right gradation of color here! The weight of the perle cotton makes the veil stand out from the background, and the light playing off the twist in the thread gives the illusion of transparency, which is just right for a gauzy veil.

Next up: I'll continue with another character from Act II!

Wednesday, November 24, 2010

Still working behind the scene


Now that the slanted gobelin stitch section of the jacquard pattern is finished behind little Coffee, I've started filling in with tent stitches using DMC floss #869.

Notice that the direction of the jacquard pattern--from bottom right to top left--is opposite that of the veil which covers part of Coffee's face. This "opposition" creates tension and adds to the exotic flavor of the overall design.

I've trimmed the veil itself with Kreinik #12 tapestry braid #014 which will make it easier to fill in this area later.

I'll be back on Friday with a finale, but in the meantime, hope all of my readers have a wonderful and safe Thanksgiving Day!

Monday, November 22, 2010

Making it easy for myself


I decided to work the background for the "Coffee" canvas in a jacquard stitch, so before I picked up needle and thread, I picked up a permanent marking pen! I certainly don't mind counting threads--after all, I am a stitch painter--but I didn't want to struggle with compensating around the central figure that interrupts the continuity of the jacquard pattern.

Once I had marked where all the tent stitches in the pattern would fall, I began stitching on Coffee's costume. Her halter top was worked in slanted gobelin stitches over two threads and the harem pants in a Nobuko stitch, both using Trio "Natural," a silk/wool blend that provided enough loft to raise these areas above the background. I then trimmed both top and pants with Kreinik #12 tapestry braid #014. Her face, trunk, arms and feet were stitched in basketweave with DMC floss #841.

I've started working on the background, using DMC floss #842 for the slanted gobelin stitches in the jacquard pattern, and will finish this area before filling in with the tent stitches.

Saturday, November 20, 2010

Coffee time!


The second canvas in my series of ornaments based on The Nutcracker ballet is the Arabian dancer, who symbolizes coffee. This lithe little lady appears in Act II as the first in a series of divertissements, or independent dances.

Poor Peter Ilyich Tchaikovsky ran into a serious problem as he was composing the music for the ballet: half-way through the first act, he had exhausted the story line of E.T.A. Hoffmann's The Nutcracker and Mouse King, the tale upon which the ballet was based. The original story ends with the battle between the Nutcracker and the Mouse King, and the rodent monarch is defeated when Clara throws a shoe at him.

Tchaikovsky decided to treat the rest of the ballet as the unfolding of the young girl's fantasy, in which the Nutcracker becomes a handsome prince who takes her on a magical journey through the Land of the Snowflakes to the Land of Sweets. A sumptuous banquet is held in the Land of Sweets for Clara and her Nutcracker, and Coffee leads off the entertainment. Tchaikovsky's inspiration for the music to which the Arabian dancer sensuously sways was actually a lullaby from Russia's Georgian province.

Do come back and watch my progress as Coffee comes to life!

Thursday, November 18, 2010

When the clock struck midnight....


....I finished the Herr Drosselmeyer canvas!

I first finished the background, working tent stitches to frame the Scotch stitches, using Kreinik #12 tapestry braid #003.

On to the inside of the clock case, where I used DMC floss #938 and white for the inside border and the dial. More DMC floss #938 in basketweave filled in the area behind the clock weights. I used two plies of DMC floss #310 in cross stitches for 3, 6 and 9 o'clock positions and two upright stitches to strike midnight.

Kreinik #12 tapestry braid #002 in half-mosaic stitches decorated the corners around the dial, with vertical long stitches forming the clock weights.

I'll move on to Act II of The Nutcracker on Saturday to begin my next canvas!

Tuesday, November 16, 2010

More progress on Herr D


I'm on the home stretch now stitching the model for the Herr Drosselmeyer canvas.

All the Scotch stitches are now in place for the background. I usually "frame" as I go along, but need to acquire the thread for the tent stitches. But before I could finish this part of the background, I needed to stitch the clock cabinet. I often use perle cotton to simulate the look of wood grain, and here selected DMC #5 perle cotton #801 in a series of slanted gobelin stitches over two canvas threads.

Once I finish the background, all that remains is the inside of the clock itself, and I'll be done!

Sunday, November 14, 2010

Mein Herr


Stitching on my first model in The Nutcracker series is well underway, and Herr Drosselmeyer is temporarily, at least, suspended in mid-air!

I began as usual with his face and hands, using four plies of DMC cotton floss #948. His top hat, cape and shoes were stitched in basketweave with black Petite Very Velvet. For his coat and trousers, I used Trio "Caviar" in a framed mosaic stitch for the coat and slanted gobelin stitch over four canvas threads for the trousers.

I then went back to his face, adding hair in tent stitches and a beard in French knots with one strand of Felicity's Garden "Snow." His mouth was then worked with two plies of DMC floss #666 in a single horizontal stitch over the French knots. The eye patch was formed with a single mosaic stitch and the eye in a cross stitch with DMC floss #310. The frogs on his coat were stitched in braided knitting with Kreinik #12 tapestry braid #002.

I've now started on the background, working Scotch stitches with four plies of DMC floss #666 which will be framed in tent stitches later.

Friday, November 12, 2010

Getting in the holiday mood

I honestly don't remember the first time I saw a performance of The Nutcracker, but I do remember the first time I danced in the ballet. I was a flower--actually more like a bud, since I was pretty young at the time.

Years passed, and the Christmas after we were married, I conned DH into seeing The Nutcracker--it was his first ballet, and his appreciation for the music outweighed his disinclination for tutus and tights. The performance became a rite of passage for our sons when they reached the age of five, and this year our oldest son will be taking a special someone to see her first performance of the ballet.

I began work on a series of ornaments inspired by The Nutcracker two years ago, got discouraged, put them away to simmer, and only recently pulled the designs out for another look. Launching the series today is Herr Drosselmeyer, the mysterious but kindly gentleman whose gift of a nutcracker to young Clara is the impetus for the ballet's story line.

Peter Ilyich Tchaikovsky (1840-1893) was commissioned to write the music for a ballet based on the tale Nutcracker and the Mouse King by German writer E. T. A. Hoffman. First performed in December 1892, the ballet tells the story of a family's Christmas eve celebration. I'll never forget one production I witnessed: as the party winds down, the guests depart and the family goes to bed. The stage lights dim, reappearing to focus on the sight of Herr Drosselmeyer perched atop a grandfather's clock. It was this memory that inspired my pose for the dapper old gentleman!

I'll be stitching the models for this series in the weeks to come, so do come back to visit and watch my progress!

Wednesday, November 10, 2010

A warm wee lass


A week or so ago, I had rummaged through my stash in search of the perfect thread for Maureen's shawl. I wanted the color to be in keeping with the way Judy Harper had painted the canvas but not necessarily all one color. Three possibilities jumped out at me, and I stitched up some samples for Judy's consideration. Happily, her choice and mine were the same!

The winner was Sheep's Silk "Forest Berries," a crewel-weight silk-and-wool blend. The overdyed thread has a lovely combination of deep rose, magenta, plum and green. The stitch I used is diagonal vertical oblong cross--I call it the simple stitch with the complicated name! I began on Maureen's right side above her arm, following the customary stitching path from bottom right to top left.

Moving on to her left side, I wanted the diagonal of the overdye to go in the opposite direction. Normally I'd just turn my canvas 90 degrees and stitch away--but not with this stitch, which becomes diagonal horizontal oblong cross and looks entirely different from the other side. What to do? I began at the top right, near her shoulder, and worked downward toward her arm. This stitching path uses a little more thread and provides more padding on the back of the canvas but creates the desired direction. I continued stitching the shawl below her arms, again orienting the stitching path accordingly to indicate where the ends of the shawl cross over one another.

Time to add the fringe! With Judy's permission, I had painted out the fringe she had indicated before I stitched the apron to provide a smoother line of framed mosaic stitches. Back in the fringe went with some looped turkey work, using a collar stay to insure the loops would be even in length.

Maureen was a joy to stitch, and I thank Judy for the opportunity to pilot-stitch this canvas for her. Here's hoping more little ethnic dolls roll off her painting table soon!

Monday, November 8, 2010

All but the shawl


I worked on a few remaining details on Judy Harper's Maureen canvas in preparation for attacking the shawl.

I needed to choose a green for the trim on her apron which would coordinate with the thread I'll be using on the shawl. DMC floss #320 blended best, so I worked the top of the apron in a slanted gobelin stitch over two threads and the edges in a stem stitch.

I wanted the shamrocks at the hem of the dress to look embroidered, so I again used the DMC floss #320 in tent stitch to outline them and then filled them in with a satin stitch using DMC floss #319.

Last, but not least, the Celtic cross that Maureen is holding! First I outlined the circle with a stem stitch, then added the spokes of the cross in cashmere stitches, all using Kreinik #12 tapestry braid #002V. The "emerald" at the center of the cross was added with a cross stitch using Kreinik #12 tapestry braid #009.

Only the shawl remains, which I'll hopefully be able to finish by mid-week!

Sunday, November 7, 2010

Crocheted lace for an apron


Maureen's apron is finished after rows and rows of framed mosaic stitch!

At the hem of the apron is a lovely pattern designed to look like Irish crocheted lace. I began working this area with a row of slanted gobelin stitches over two threads. Next came the interlocking chain pattern in basketweave, followed by another two of slanted gobelin stitches. The "fringe" at the very bottom was worked in a series of Smyrna crosses.

I then went back with the dark green Petite Very Velvet and filled in the areas where the dress peeks through the open areas of the lace. I'll need to find just the right shade of green floss for the edging of the apron so it will blend with the thread I have in mind for the shawl.

Friday, November 5, 2010

Stitching a party dress


A lot of dark green Petite Very Velvet went into Maureen's dress, but it's all done except for the sections that peek through the crocheted lace of her apron.

I then moved on to the top of her apron, for which I already knew I would use white DMC cotton floss. But what stitch to use? The hem of the apron will be quite fancy, so I needed a stitch which would make a subtle statement of its own as well as provide textural contrast against the smooth Petite Very Velvet. I decided on a framed mosaic stitch--small in scale, but which compensates easily as the apron narrows from the bottom to the top.

I have quite an expanse of apron to work on before I can treat myself to the fancy work at the hem, so I'd better get to work!

Wednesday, November 3, 2010

Back from the beauty salon


No, not me!--I get a haircut every two years whether I need it or not! It's Judy Harper's little Maureen who's just had her make-up applied and her hair coiffed.

I began by stitching the skin tones in DMC cotton floss #948, with DMC floss #3774 for shading. I stitched over the eyebrows, going back later to add them on top of the worked areas using two plies of DMC floss #632 and then adding the eyelashes. The mouth is DMC floss #761.

Before starting in on her hair, I stitched the tops of her sleeves in basketweave with dark green Petite Very Velvet--I want this little gal to be decked out in her best duds!--and added a headband in the same thread.

I used my hands-down favorite thread for hair--Silk & Ivory--in "Cinnamon," a rich auburn shade. This 50/50 blend of silk and wool gives hair the sheen of silk, the loft necessary to make it stand out from the face, and the look of natural hair. I worked it in satin stitch, following the sections of swirls and curls as they were painted on the canvas.

I'll move on to the dress next, as there's a fair amount of basketweave to be stitched that I want to get behind me!

Monday, November 1, 2010

New month, new project


It isn't often that I get to start a new project on the first day of a month, but this one I'm definitely looking forward to. Knowing that I've been on an "Irish kick" lately, designer Judy Harper asked if I would pilot-stitch a canvas for her. As an outgrowth of her angels series, she's contemplating some new designs of dolls representing different foreign countries. Here's Maureen, a wee Irish lass!

Having already stitched Judy's July and December angels, I knew what fun was in store and immediately agreed. We've discussed threads and stitches I might use, and I have my marching orders: no bullion stitches for the hair, no "special effects," and--above all--no goop!

Halloween's over--time to move on to a female form that's fresh-faced and charming! I think Maureen definitely fits the bill.

Saturday, October 30, 2010

The eyes have it


The Molly O'Beagle canvas by Nenah Stone is finished!

By the time I completed stitching on the beagle, I had used six different shades of brown Burmilana thread. For some areas, I used two strands of one color; for other sections, I combined one strand of two different colors to needle-blend the shading.

I love the expressive eyes that Nenah painted. I first outlined them in the darkest brown, then filled in with white, black and a warmer brown with the whites of the eyes actually a pale yellow DMC floss.

I'd never stitched an animal this size before, and I found it to be quite challenging but rewarding. My thanks to Nenah for doing such a great job helping little Molly come to life! After the weekend, I'll start a new project--one with a human form!

Wednesday, October 27, 2010

Getting nosey


I got a little carried away since my last post--I was so into my stitching, I didn't stop to take a picture!

Flashback to a couple of days ago, when I visited my LNS for threads for Molly O'Beagle herself. I had Felicity's Garden in the back of my mind as the thread I'd use: just the right weight, and the combination of silk and wool would give her coat a nice sheen. But there weren't enough browns in stock at the time, and Barry, the owner, suggested Burmilana, a wool/acrylic blend. This thread requires two strands on 18-count canvas, which turned out to work to my advantage.

I started stitching with the white Burmilana at the top of her head and worked down past her chin line. I added the nose, mouth and shading, and decided to work on the chest area awhile. I kept stitching, and stitching, and stitching--until the whole chest area was finished. I wanted to try out a little needle-blending on her shoulders, using one strand each of two different browns, so I stitched the shoulders. Then I decided, what the heck!--I might as well finish the shamrocks that overlapped the chest.

Oops! Time and then some to take a picture! I've started outlining Molly's head and will hopefully soon be finished with this canvas!

Monday, October 25, 2010

Growing shamrocks


There are three distinct areas in Nenah Stone's Molly O'Beagle canvas: the sky in the background; the dog in the center; and the shamrocks in the foreground. So in selecting a thread for the shamrocks, I needed something that would provide a higher profile as well as being green!

Rummaging through my stash, I pulled out two distinctly different threads that would meet my requirements: Petite Very Velvet and Silk & Ivory. When I held up the three shades of PVV to the canvas, they turned out to be too dark--I needed brighter greens. So the Silk & Ivory won!

I started working on the veins of the shamrocks first, using S & I "Honeydew" in tent stitch--a bit tight on 18-count canvas but still do-able. This helped define the segments of the shamrocks, making it easier to then work the rest of the plants in satin stitch with S & I "Kelly," the lighter shade, and "Emerald." To make the shamrocks stand out even further, I filled in the areas around them with DMC floss #911 in basketweave.

I'll continue working on the shamrocks but I'll avoid the areas which overlap the white on the dog's chest so as not to create problems for myself down the road!

Saturday, October 23, 2010

A lot of blue sky


Finally!--I finished stitching the sky behind the beagle in Nenah Stone's canvas.

The dog is obviously the most important element in this design, so I wanted to keep the background subtle yet attractive. So--once again--I needle-blended, beginning at the top of the canvas with DMC floss #3755.

Using four plies of the floss, I worked down to the top of the dog's head in basketweave, staggering the bottom stitches randomly. I then added DMC floss #3255 into the mixture, using one ply combined with three plies of DMC floss #3755. I continued subtracting one ply of the darker shade and adding one of the lighter to the mix until I reached four plies of DMC floss #3255. At this point, DMC floss #3841 was worked into the formula. By the time I hit bottom, I was using one ply of DMC #3255 and three plies of DMC #3841.

The canvas is now actually about one-third stitched! I think I'll scour my stash for some shamrock threads next, so stay tuned.

Friday, October 22, 2010

A good day's work


Yesterday was a mixed-bag day, but a good one!

I began the day with a trip to my LNS, Town-Ho Needleworks, shopping list in hand as if I were going to the grocery store. I also brought along my little Leprechaun, who will be finished as a cylindrical ornament.

Greeting me at the LNS was Humpty Dumpty, finished as a stand-up! If you recall, I designed and stitched this little fellow for my neighbor's newest granddaughter, Amelia, who was born at the end of August. I'm thrilled with the way this gift was finished--the cording provides just the right amount of twinkle without going over the top!

I also scooped up a bunch of threads that I'll be using to stitch the beagle in my new Nenah Stone canvas--I needed an assortment of browns that just weren't forthcoming in my stash. Now that I've finished painting an order, I can go back to needle-blending the sky behind the beagle. And I need to finish stitching an ornament that I've been working on behind the scenes as the last Christmas present for this year. Busy days, busy people!

Tuesday, October 19, 2010

Fall's last hurrah


While I'm very slowly but surely needle-blending a sky behind the beagle in my new canvas, I wanted to share some photos of the last addition to my perennial garden. Have you ever seen a chrysanthemum this big before? I know I haven't!

It's name is "October Glory" and is a species of English chrysanthemum that I planted two years ago. Over the course of the summer, while the bunnies were happily nibbling on the aster next to it, "OG" just kept growing bigger, and bigger, and bigger. It squeezed out the Shasta daisies, spilled out over the phlox, and encroached on the plumbago. Just a week ago, it started to hint at the glorious peach of its blossoms and now, two-thirds of the way through October, is still popping new flowers daily. And yesterday, when these photos were taken, it had a visitor--a plump bumble bee in the middle of the second photo!

Sunday, October 17, 2010

Always room for one more


Have you ever stopped to think how many painted needlepoint canvas designers there are? Probably as many as there are personal tastes and interests among stitchers! If you've ever looked on eBay under the category "hand painted needlepoint canvas," you'll find it resembles a remake of the classic Clint Eastwood movie The Good, the Bad and the Ugly. But as my sainted Irish grandmother used to say, "One man's pie is another man's poison." Some may be attracted to modern designs with bright colors or trendy themes, whereas I prefer timeless pieces that are well-painted.

So when I visited the website of newcomer Nenah Stone recently--www.nenahsneedle.com--I was enchanted! Painting animals is not my forte, but it certainly is Nenah's. The expressions she achieves on her cats and dogs are amazing. Sensing a fellow dog lover here, I corresponded with Nenah to find out more about her source of inspiration and background. I wasn't at all surprised to learn that she volunteers at an animal shelter and donates a percentage of her sales to it. She's also a member of a pet therapy group which takes dogs to visit at nursing care facilities and hospitals. Add to this the fact that she comes from an artistic family and is a stitcher herself, the result is a line of beautifully executed animal canvases.

I sent Nenah a photo of our own Molly O'Beagle and asked her to see what she could do on canvas. I'm thrilled with her interpretation and look forward to stitching this canvas as my next project!

Friday, October 15, 2010

At the end of the rainbow


His shoes are on, the shamrocks are planted, and the little Leprechaun is finally finished!

I used the black Petite Very Velvet from his hat to work the shoes, adding little buckles in tent stitch with Kreinik #12 tapestry braid #002V. The shamrocks were formed with mosaic and tent stitches using DMC floss #910.

Last, but not least, his pot of gold is a definite update from my original model--I used Kreinik #12 tapestry braid #02L, the holographic thread introduced at the beginning of this year. I was aiming for some surface relief to the face of the pot to give it a slightly hammered look and to maximize the twinkle of the holographic thread. So I combined stitches--slanted gobelin, cashmere, and tent stitches--in alternate rows over two threads. My Leprechaun is going to have a hard time hiding this pot of gold with all its sparkle!

Wednesday, October 13, 2010

A leg on


The good news is, I finally finished painting an order--now I can concentrate on the poor little Leprechaun, whose pants are only half-done!

The thread I chose for his knee britches is Rainbow Tweed, a four-ply strandable wool. It's the successor to Rainbow Gallery's Tweedie 18, a thread I absolutely loved for special effects which came in an assortment of beautiful colors. I'm using two plies of the Rainbow Tweed here in a vertical gobelin stitch over two canvas threads. It makes for a nice contrast in texture against the Trio silk/wool blend of his coat.

Time to get out the turbo needles, so I can wrap up this canvas and show this little guy in full sartorial splendor!

Sunday, October 10, 2010

Half-dressed!


I haven't heard any complaints yet from the little Leprechaun over the speed, or lack thereof, with which I'm getting him dressed! Half a coat is better than no coat at all, right?

Before starting in on the coat itself, I outlined the arms with DMC floss #319 for more definition. I chose Trio "Shamrock"--an appropriate name, don't you think?--in Scotch stitches to give him a nice, warm quilted coat.

At the time I stitched my model, Brown Paper Packages had just introduced Silk & Ivory, a single-ply thread blending 50% wool and 50% silk. A great thread with a wonderful "hand," S & I is terrific in decorative stitches on 18-count canvas but packs a little tightly in basketweave. Brown Paper Packages subsequently introduced Trio, S & I's svelte sister, a strandable three-ply thread. The single ply I'm using here provides more than adequate coverage.

Before I could finish off the hem of his coat, I needed to work on his stockings. I was aiming for a woven look here, so I've combined two stitches--braided knitting and vertical gobelin stitches--in alternate rows two threads wide using four plies of white DMC floss. As soon as I finish his stockings, I can start giving the poor little guy some knee britches!

Thursday, October 7, 2010

A beard and mutton chops


Hairy little fellow, isn't he? I achieved some major stash-busting in stitching the Leprechaun's hair, beard and sideburns (aka mutton chops), using two strands of DMC Medici wool "imported" from Texas days. One of the benefits of cleaning out my office/studio over the weekend was finding my "hair bag" of old Medici in various colors, and this reddish-brown seemed to be the perfect color for this canvas.

Before I could stitch the French knots for his sideburns, I needed to work the lapel area of his coat. Here I used Petite Very Velvet V623 in basketweave, and finished off the thread in my needle by working the belt on his coat in slanted gobelin stitches.

Another difference in thread choice between my original model and this new version of Leprechaun is the metallic thread I selected: Kreinik #12 tapestry braid. This size of metallic had just been introduced by Kreinik at the time I stitched the model and I hadn't yet tried it--but I'm ever so glad I finally did! The model had used Kreinik #16 medium braid--a little too thick for 18-count canvas, whereas the #8 fine braid was a little too thin. I think the #12 tapestry braid is the Goldilocks of metallic thread for 18-count--just right! I used the #009 in slanted gobelin stitches to trim his hat and the #002V in tent stitches for the hat buckle and in Smyrna crosses for the buttons on his lapel.

Now I can warm up this little fellow by stitching a coat for him!

Monday, October 4, 2010

Somebody's winking at me!


Cleaning my office/studio, plus painting an order, plus fighting a head cold equals not much stitching time! But I've started in on the little Leprechaun, beginning with his face so I have something cheerful to look at as I progress.

Even at this early stage, I've made some observations about the differences in the way I'm stitching this one versus the way I stitched my model several years ago. In that time, I've "plied down" in my use of cotton floss: using four plies now instead of six, making for a much smoother appearance.

Another switch-- next in my stitching order-- will be in my choice of thread for the Leprechaun's hat--black Petite Very Velvet. I don't think the petite version was even available when I stitched the model. I then used Fleur de Paris fine mesh velour, which was offered in a zillion gorgeous colors, but which has since been discontinued by the manufacturer.

With his little face now basically finished, I can move on to his hat and hair, including a fairly substantial beard!

Saturday, October 2, 2010

A wee bit of whimsy


If you've been following the commodities market in the news lately, you know that the price of precious metals has been increasing significantly. The price of gold is on the rise, spurring a lot of folks to rummage through their old jewelry in search of hidden assets.

My office/studio has been the repository of several pieces of unused furniture since we moved to the Cape four years ago. The good news is this furniture is about to go to a new home; the bad news is I need to clean up my act! While rearranging things, I, too, came across a "hidden asset"--my little Leprechaun cylindrical design, and he's holding a pot of gold!

I stitched a model of the Leprechaun several years ago, but I've decided to rework him for someone else. It should prove to be an interesting experiment in how my stitching has progressed since the first little fellow came to life, so stay tuned!

Wednesday, September 29, 2010

Last but not least


"Oceana"--the name I've given to the third needlepoint interpretation of a Sailor's Valentine--is finally finished! I've probably attached more beads, chips and trinkets to canvas in the last several weeks than I've done in a lifetime.

The sandy corners of the canvas received some darling little starfish. At 12, 3, 6 and 9 o'clock positions, I sewed on some mother-of-pearl chips and Czech opal beads.

Surrounding the center diamond are four sea glass chips that, to me, anyway, resembled swimming fish. Another specimen shell from my friend in Florida provided the centerpiece.

This was certainly an interesting experiment in combining "found" treasures with colors and threads I particularly favor to create a small ornament or scissors fob. While I was inspired by Sailor's Valentines in determining the octagon shapes of these designs and their shell decorations, I can see other shapes adapted to make personalized designs using different shapes and trinkets lurking in your stash to embellish a needlepointed background.

Sunday, September 26, 2010

Finishing the background


After finishing the blue center sections, I moved on to the four corners, stitching sand in basketweave with DMC cotton floss #3033. I then added some seafoam using Kreinik #12 tapestry braid #032 in French knots.

Now for some top stitching! The seaweed was worked in stem stitch with one strand of Watercolours "Evergreen." I then added little sea "treasures" with French knots and Smyrna crosses in three different values of blue floss in the same color family.

At this point, I need to decide if my stitching is completed--I don't want to start sewing on any trinkets before I'm really ready for them!

Friday, September 24, 2010

Exploiting the properties of a thread


Just for fun, I decided to try out one more version of a Sailor's Valentine--this time with a bit more of a contemporary feel. As you can see, I've already begun stitching the background .

The center diamond was worked with a solid blue DMC cotton floss, while the outside used DMC Color Variations floss. I generally shy away from a variegated thread, for the simple reason that a certain amount of diagonal streaking is inevitable when stitching in basketweave.

Streaks in a sky certainly wouldn't do as the baskground for a lighthouse, for instance. But here, I'm trying to give the impression of water, with all its subtle shadows and currents. So the variation in color from lighter to darker values actually becomes an element of the design.

So far, so good--now I need to finish stitching the background so I can start embellishing!